Home Blog Page 26

Fix Voice Chat Stuck at “RTC Connecting Discord” Issue

0

Many gamers who use discord platforms are facing the issue of RTC connecting discord from the last few days. This issue is related to sound and it does not allow you to connect sound most of the time. The main reasons behind this issue include a slow network connection or some internet restrictions from your WiFi admin. The other reason behind this might be the wrong settings or configurations of your device.
In this blog post today we are going to list out methods to fix Discord stuck at RTC connecting. These methods are totally working and will fix your issue quickly.

Contents

What causes RTC Connecting to get stuck?

Some possible reasons behind this annoying issue are listed below:-

  • Change in IP address assigned to PC
  • Discord being blocked your network admin
  • Incompatible server’s voice region with your client
  • Discord is getting blocked by firewall or antivirus
  • PC using VPN without UDP(User Datagram Protocol)

How To Fix RTC Connecting Stuck Issue on Discord?

Here we are going to list out the methods to fix the issue of RTC connecting discord issue. Let’s begin:-

1. Remove VPN Or Using VPN With UDP

Discord app is not developed to run with a VPN without a UDP. Firstly you need to check if VPN is really causing the problem by turning it off and then running discord. If VPN is really causing the issue then you need to use a UDP (User Datagram Protocol) configured protocol.01QWCButBO7JkZsobcrBRrX 1..v 1569492618
If this method does not fixes your issue then move to the next method.

2. Restart Everything

By restarting everything we mean to restart everything that is externally connected to your PC. You have to restart your Modem/Router and System. There is no need to reset settings of your router/Modem. You just need to restart by plugging it out. That’s so simple.Screenshot 142
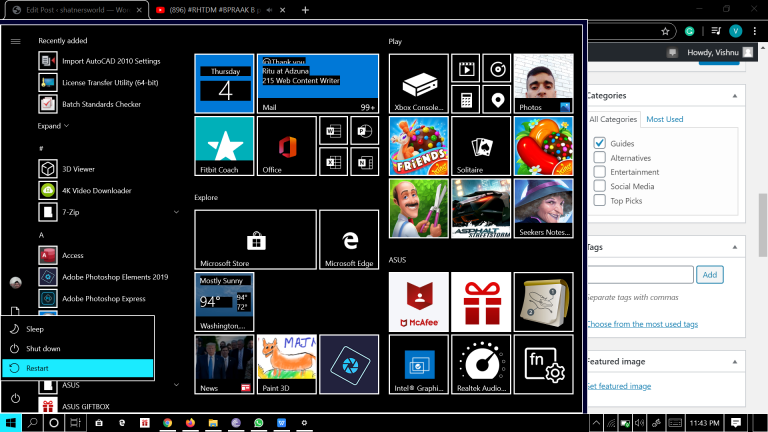
We don’t think that there is a need to tell you “How To Restart Your PC”?. So you can also try this trick in order to fix this issue.

Move to the next method if this does not work for you.

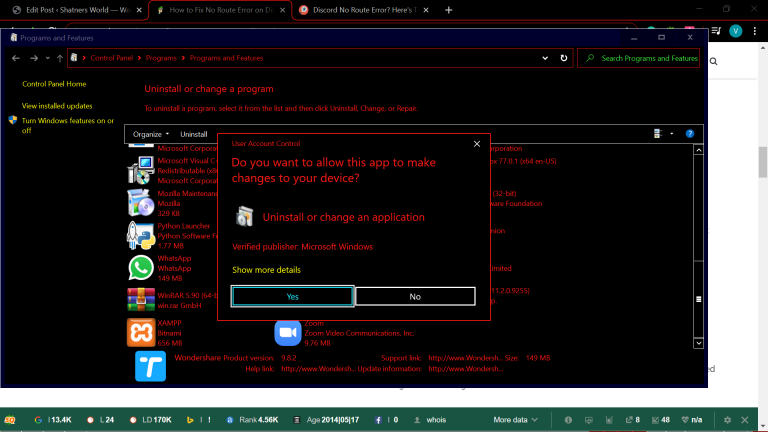
3. Uninstall/Remove Third-Party Firewall or Antivirus

Another reason that might be causing this issue is your overprotective Antivirus that is disallowing Discord to maintain outgoing connections. To determine that if your antivirus is raising this issue you need to uninstall it completely. Here are the steps that would help you in fixing the issue:-

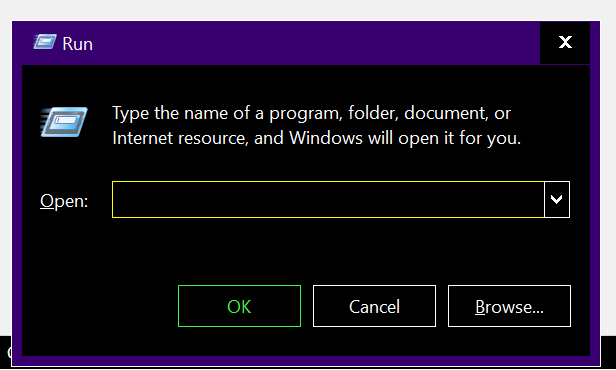
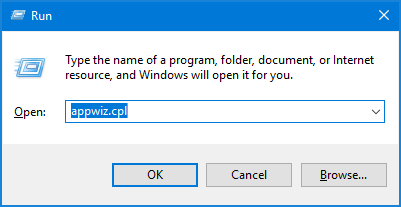
  1. Press the Windows+R button to open the Run dialog box.
  2. Type appwiz.cpl  in the dialog box and hit enter
    appwiz
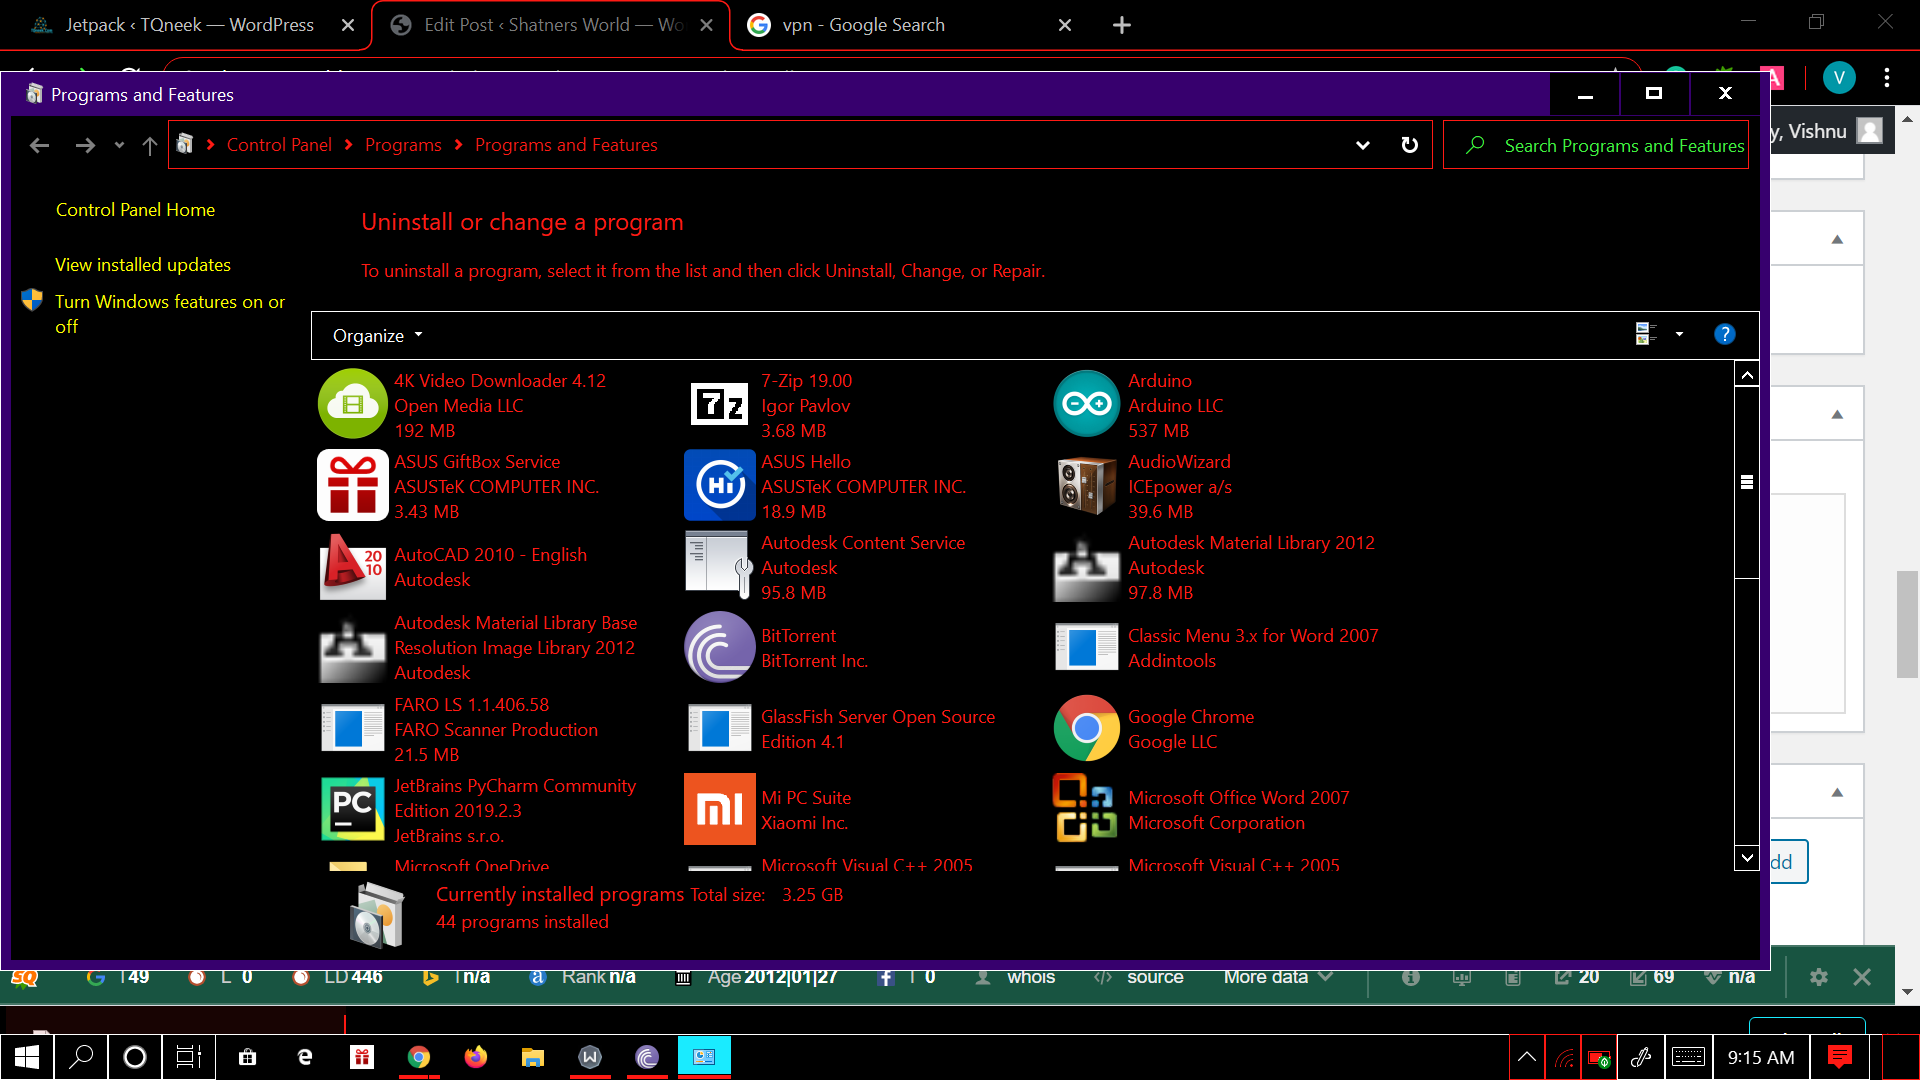
  3. This will open all the programs running on your System.Screenshot 143
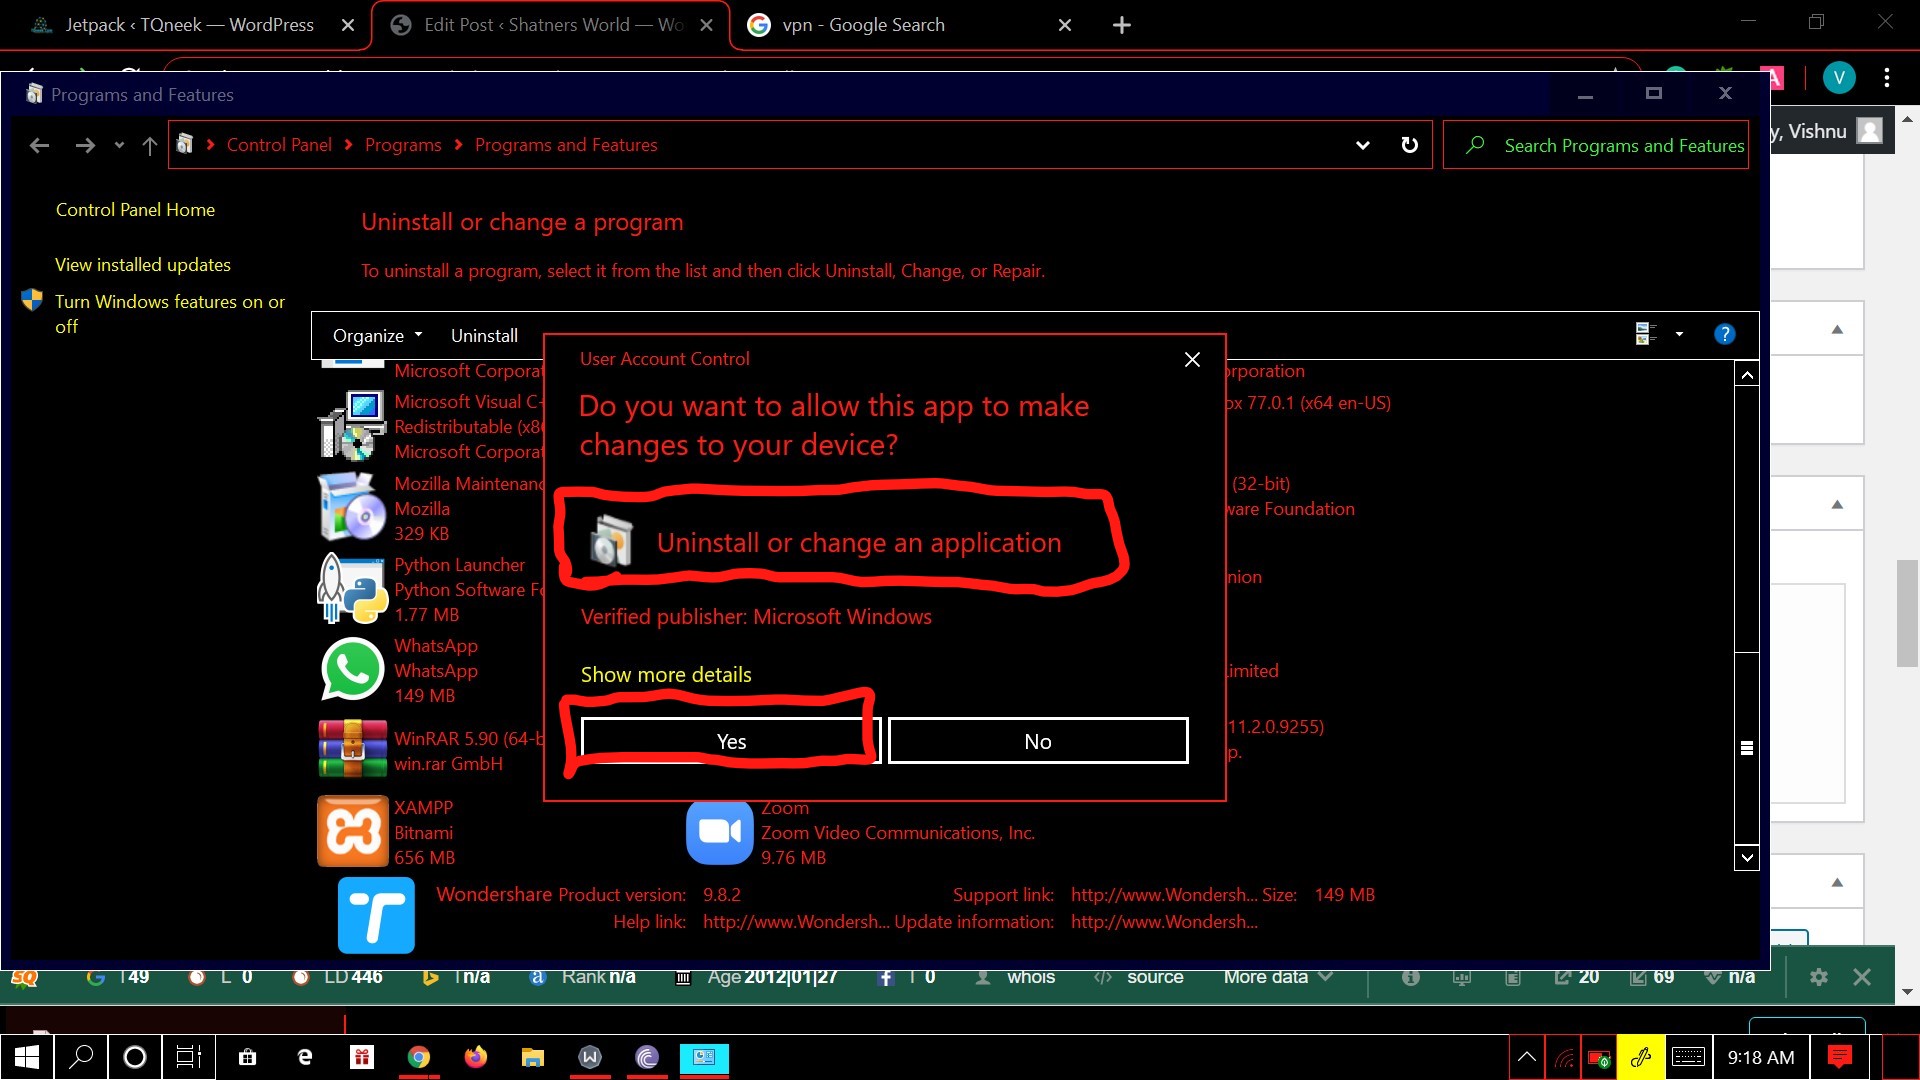
  4. Click on your third party application and then press uninstall.POLL
  5. Restart your PC and Run discord to see if it is still having any issues.

4. Check Wheather Discord Is Blocked By Your Network Provider

If your network provider has blocked discord then it surely causes problems for you. However, there is a trick that will surely help you tweak this concern. Just follow these simple steps:-

  1. Press the Windows+R button to open the Run dialog box.Screenshot 90 e1591676448684
  2. Type “Control” to open the control panel
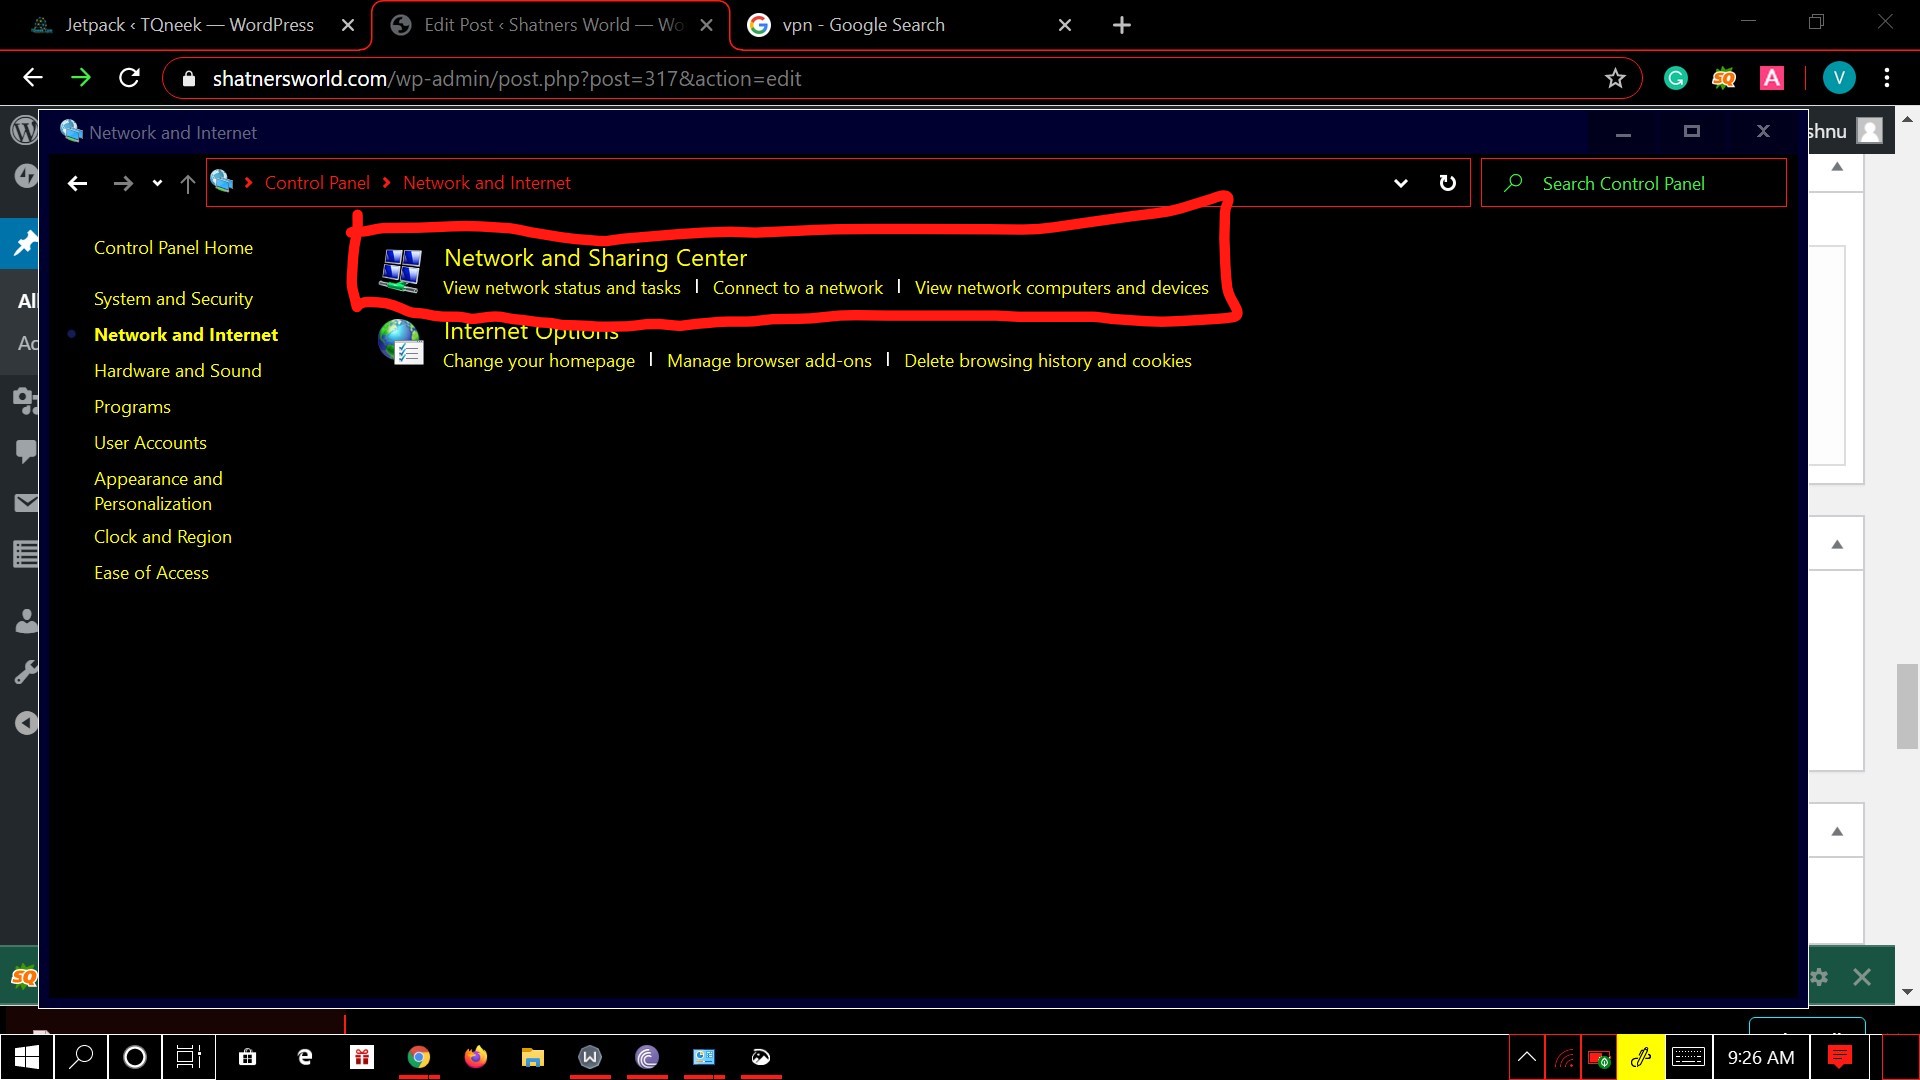
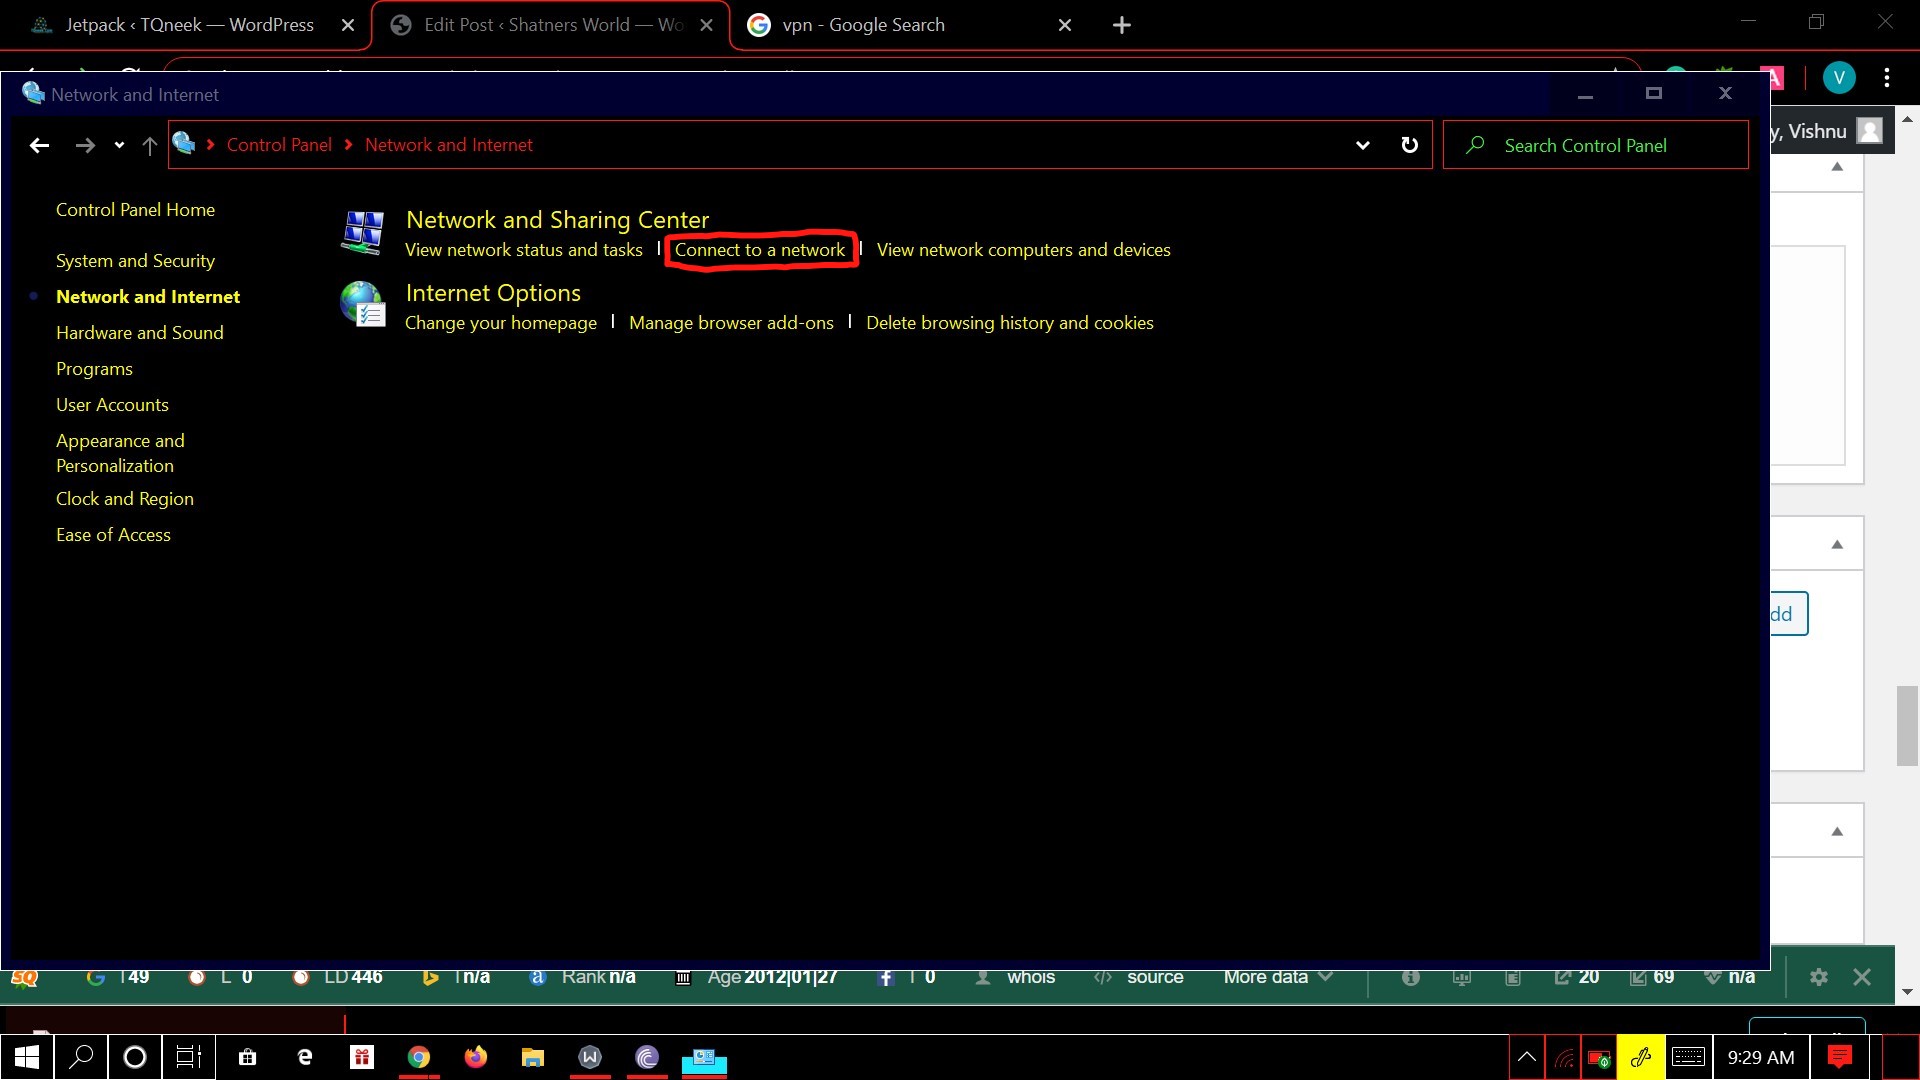
  3. Navigate to Network and the Internet and then Network and Sharing CentreLKJ 1
  4. Click on Connections linked with private networks.BNM
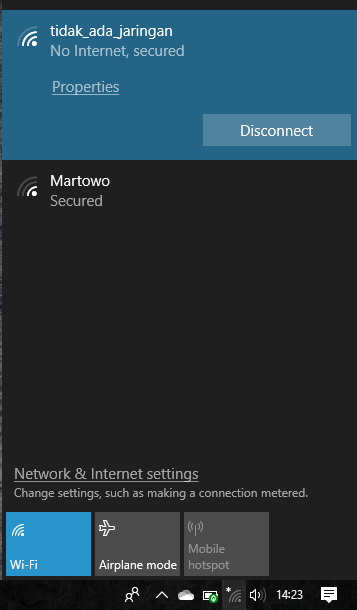
  5.  Click on Properties when next window appears on your screen
    494ababb f704 40d7 9414 9eb648173fac
  6. Go to the networking tab and select Internet protocol version 4 and hit properties again.
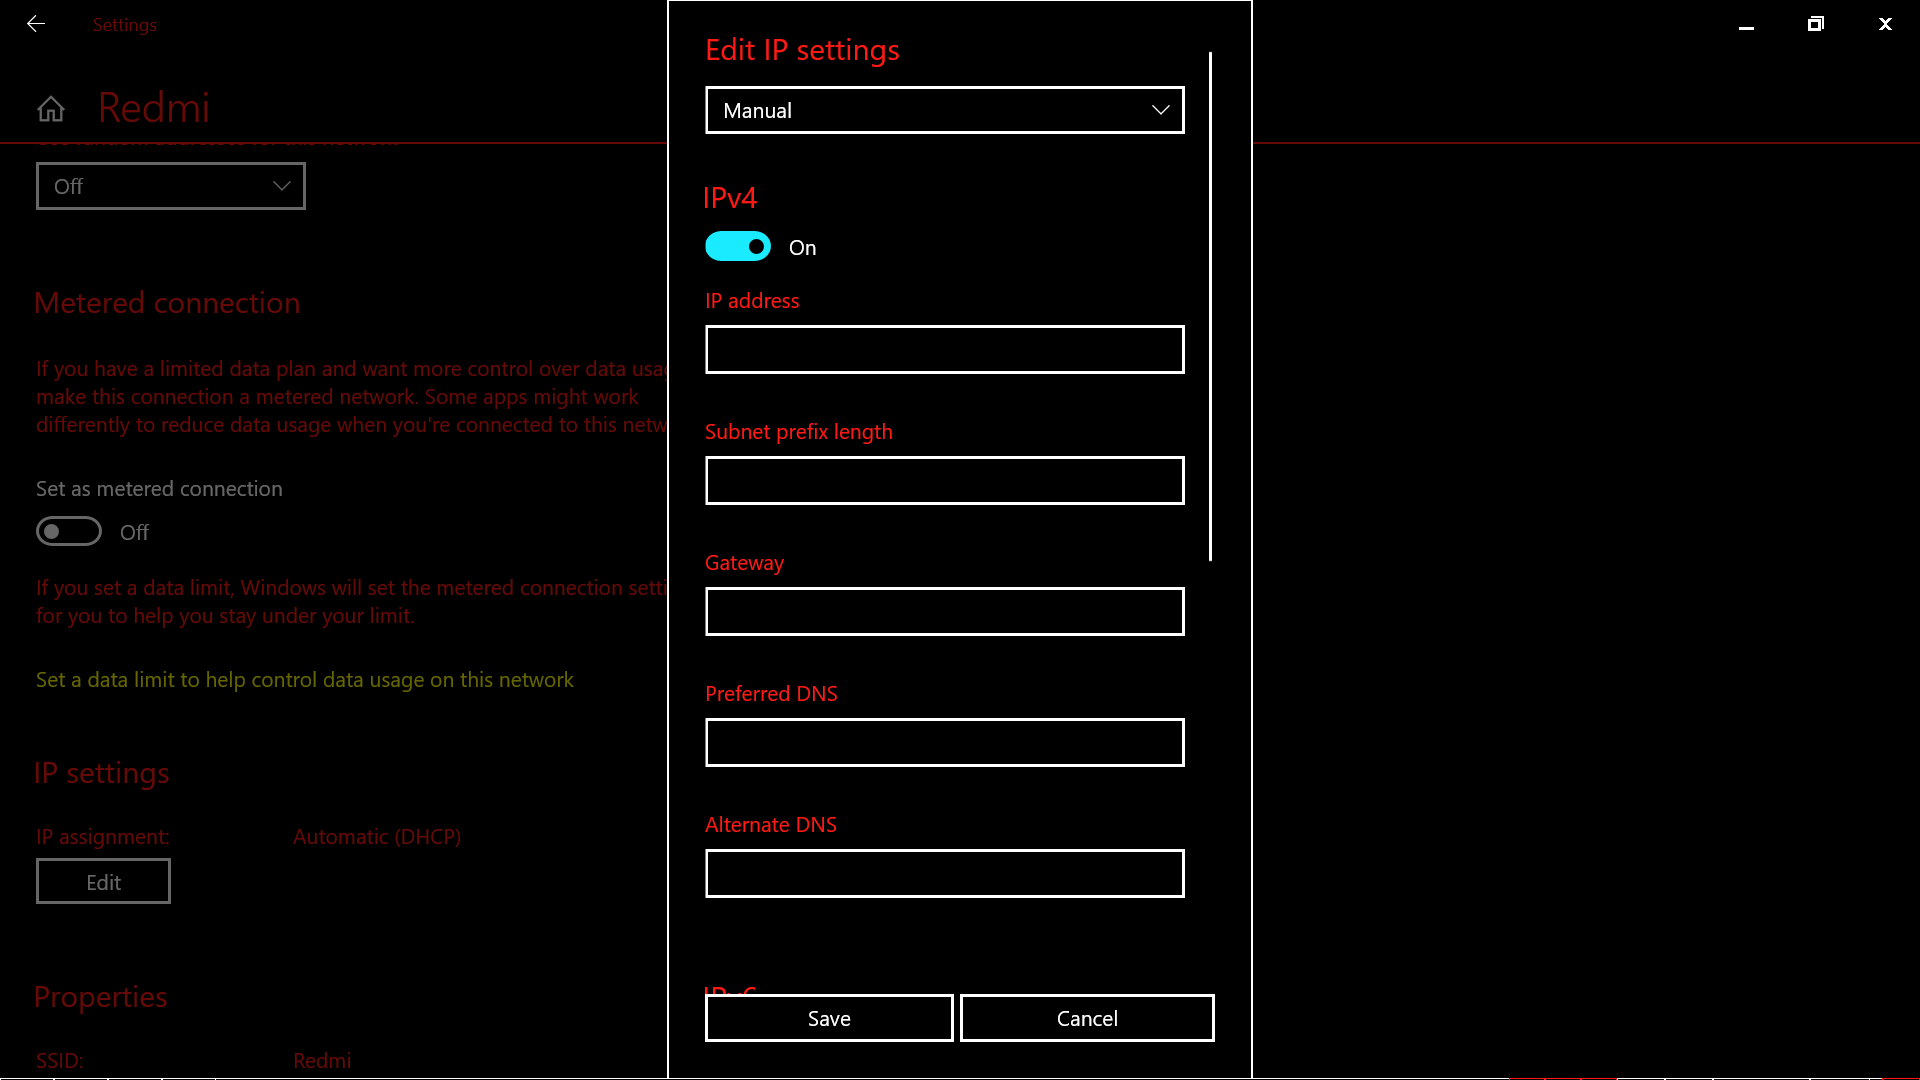
  7. Navigate down to the DNS server settings.Screenshot 145
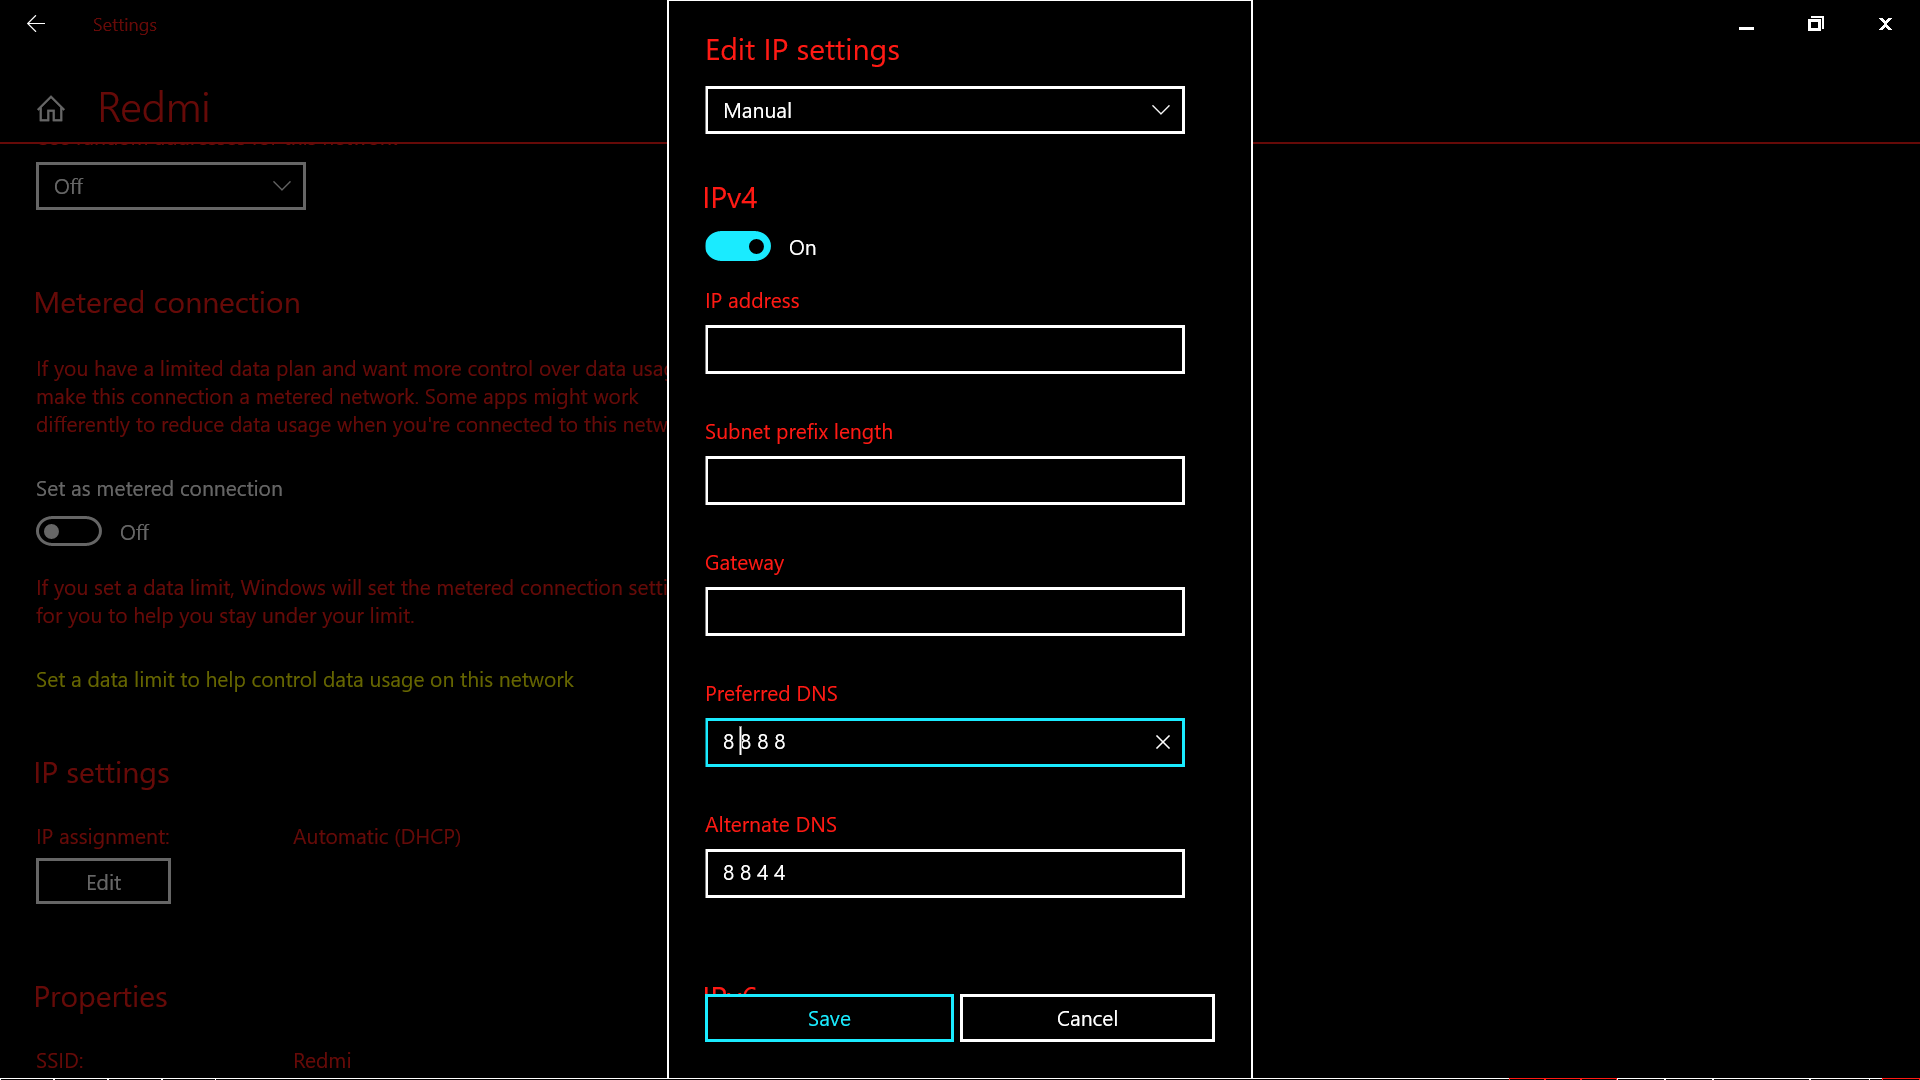
  8. Set the value of Preferred DNS as  8 8 8 8 set the value of alternate DNS to 8 8 4 4. Press Ok to save the changes.Screenshot 146
  9. Now reboot your computer and launch discord. This will surely fix your issue if you are facing issues due to blocked discord from the network provider.

5. Change Voice Server’s Region

Sometimes you encounter this issue whenever you try to connect your friends from other countries or subcontinent. Then it is surely caused by the server having different voice regions. You need to change this in order to fix the issue.discord voice change 2 e1592628334334
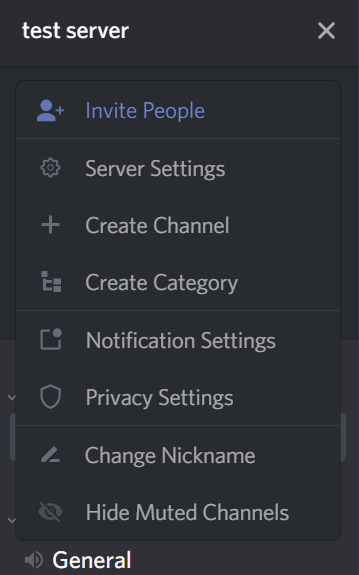
You can ask your server admin to set different voice region from server settings. Voice region can be changed easily from admin by navigating to Server Settings > Server region.

6. Flushing the DNS Settings

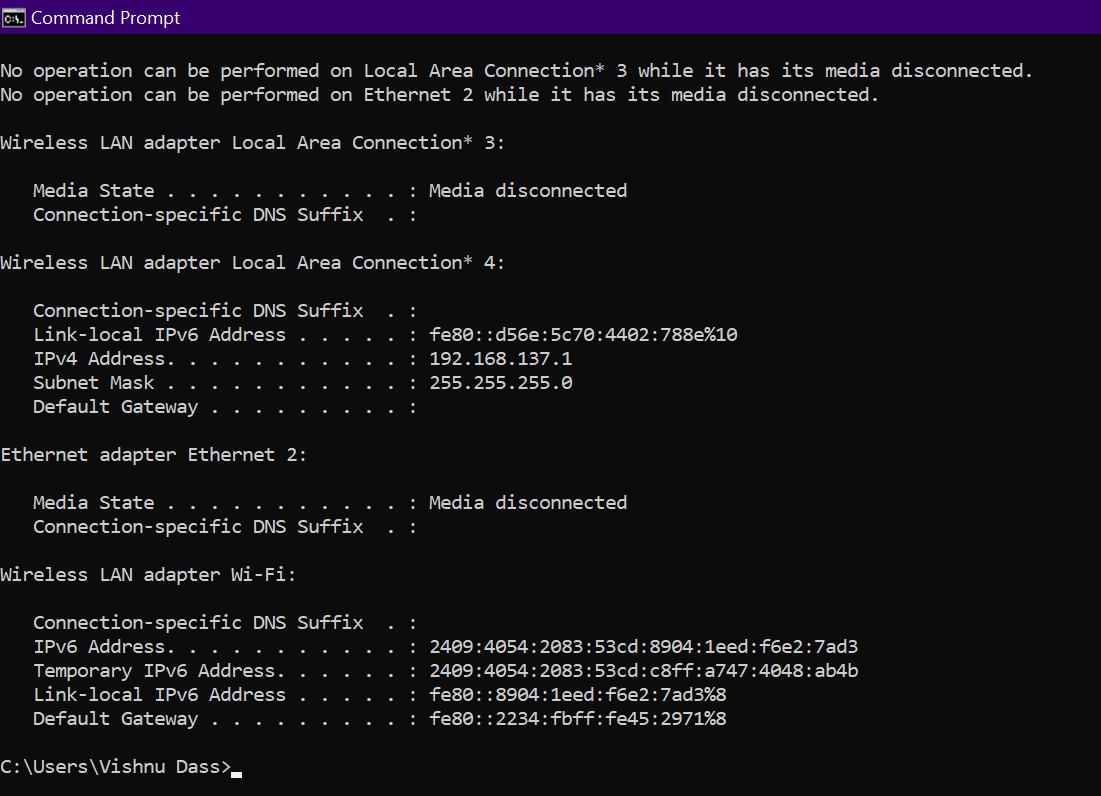
Flushing DNS settings can also help you fix this issue. The steps mentioned below have fixed this issue for many users. Go through these steps to flush DNS and fix the issue.

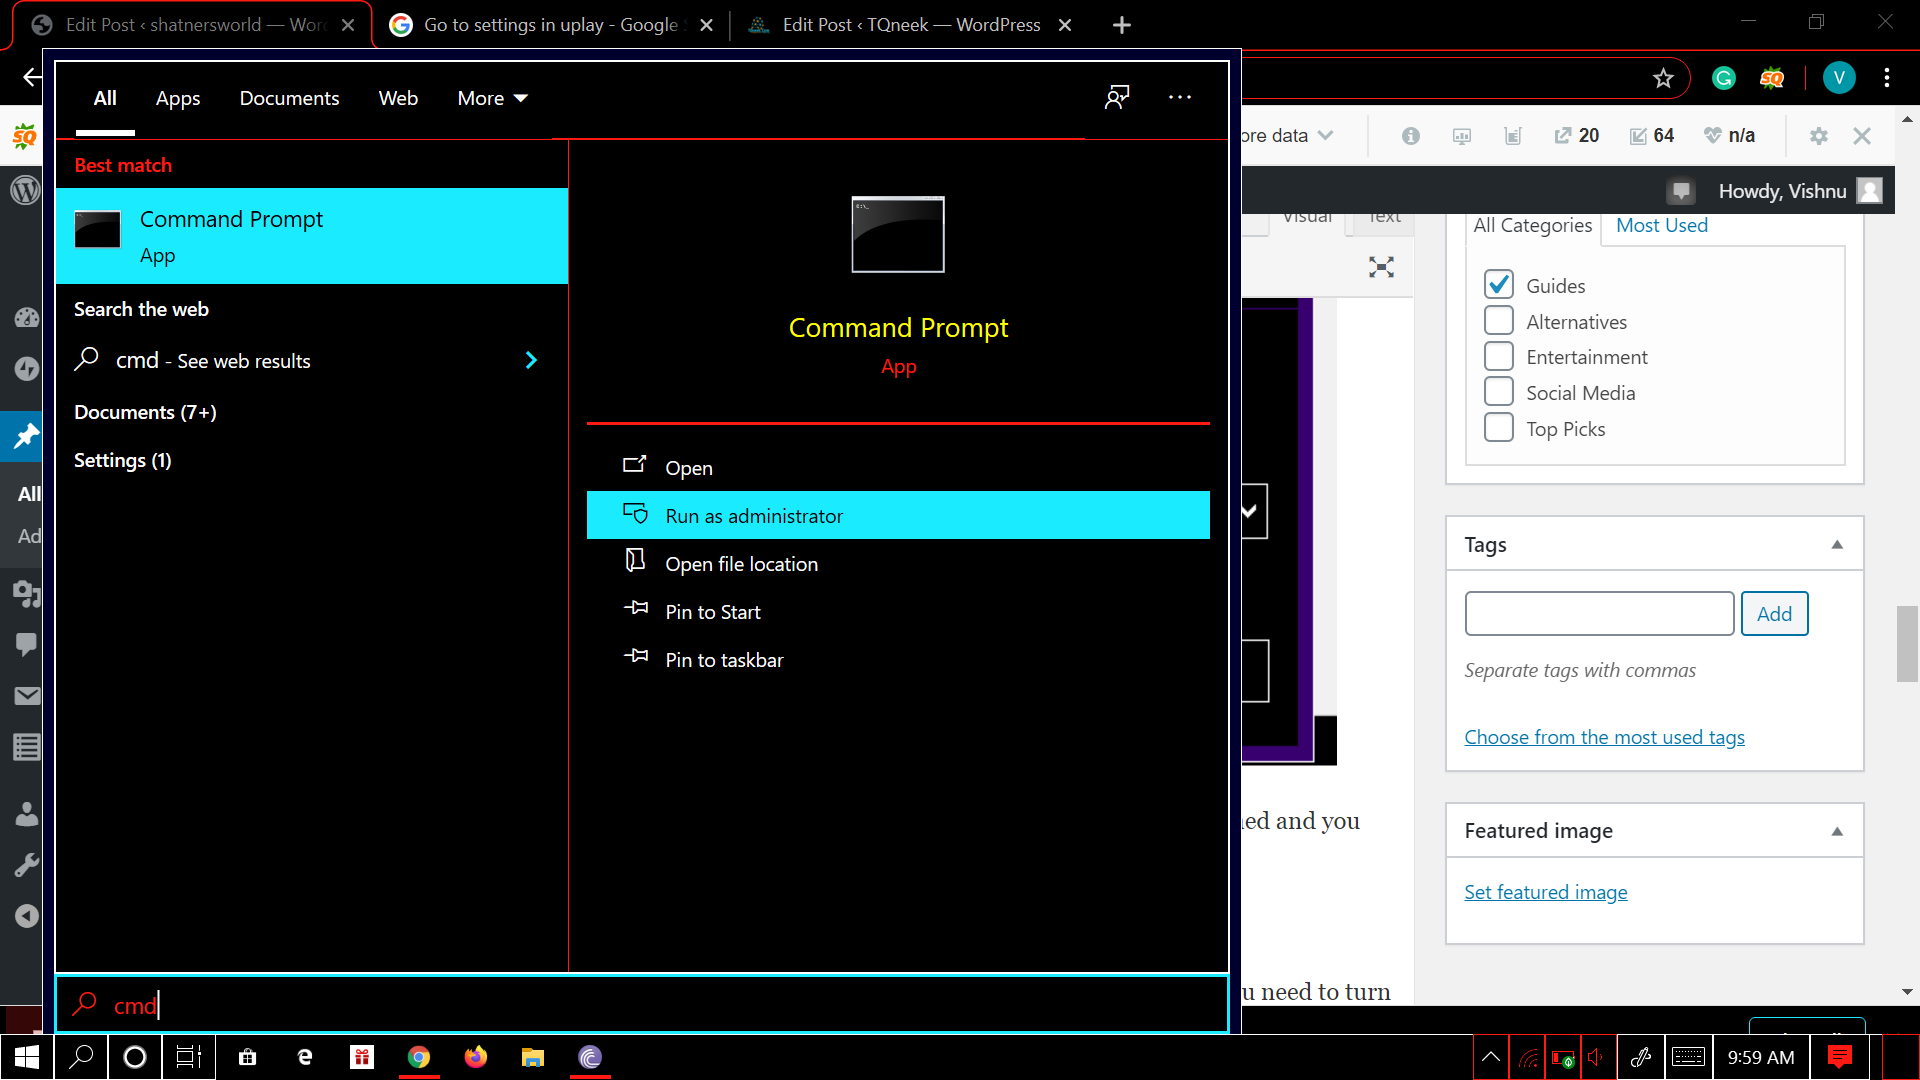
  1. Press Windows and then type CMD to open the command prompt.Screenshot 126
  2. Type this command in CMD window ipconfig /releaseScreenshot 148
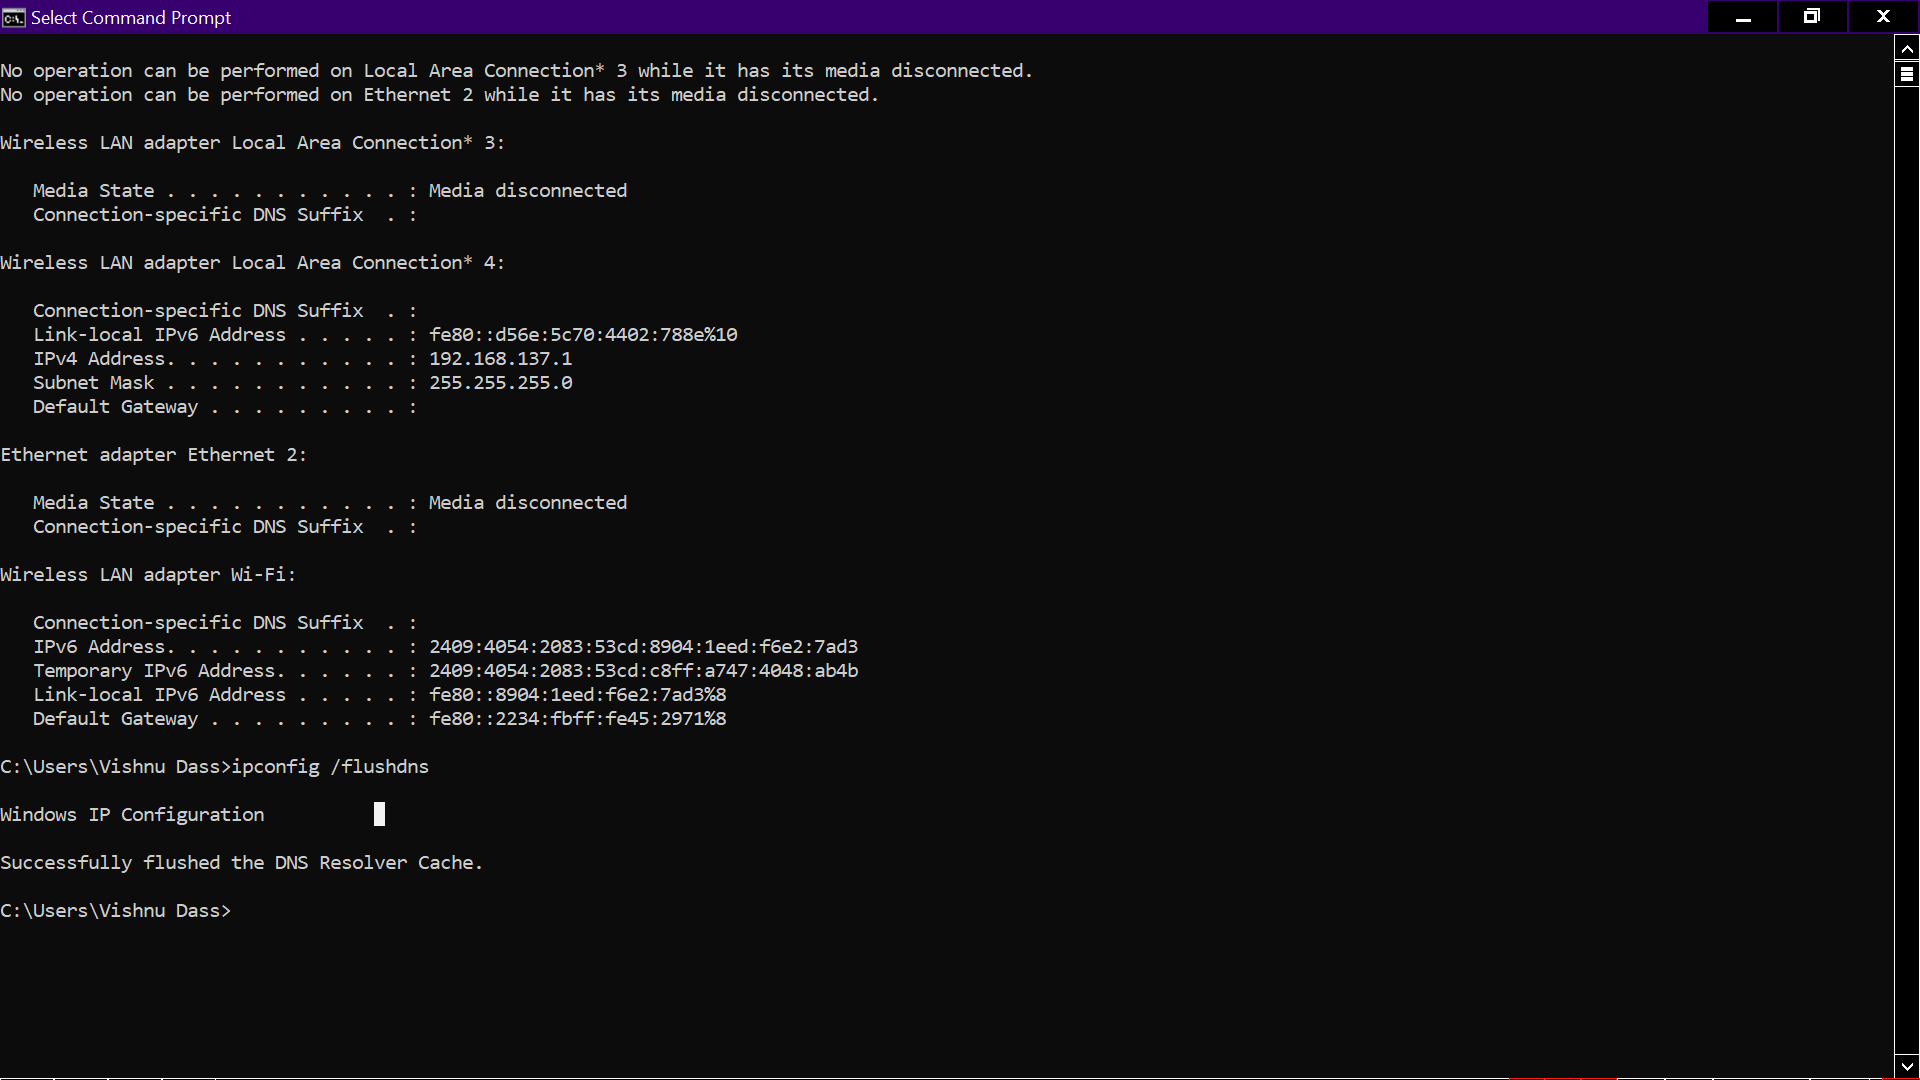
  3. When the current IP configuration has been released then you have to flush DNS by entering this command ipconfig /flushdnsScreenshot 149
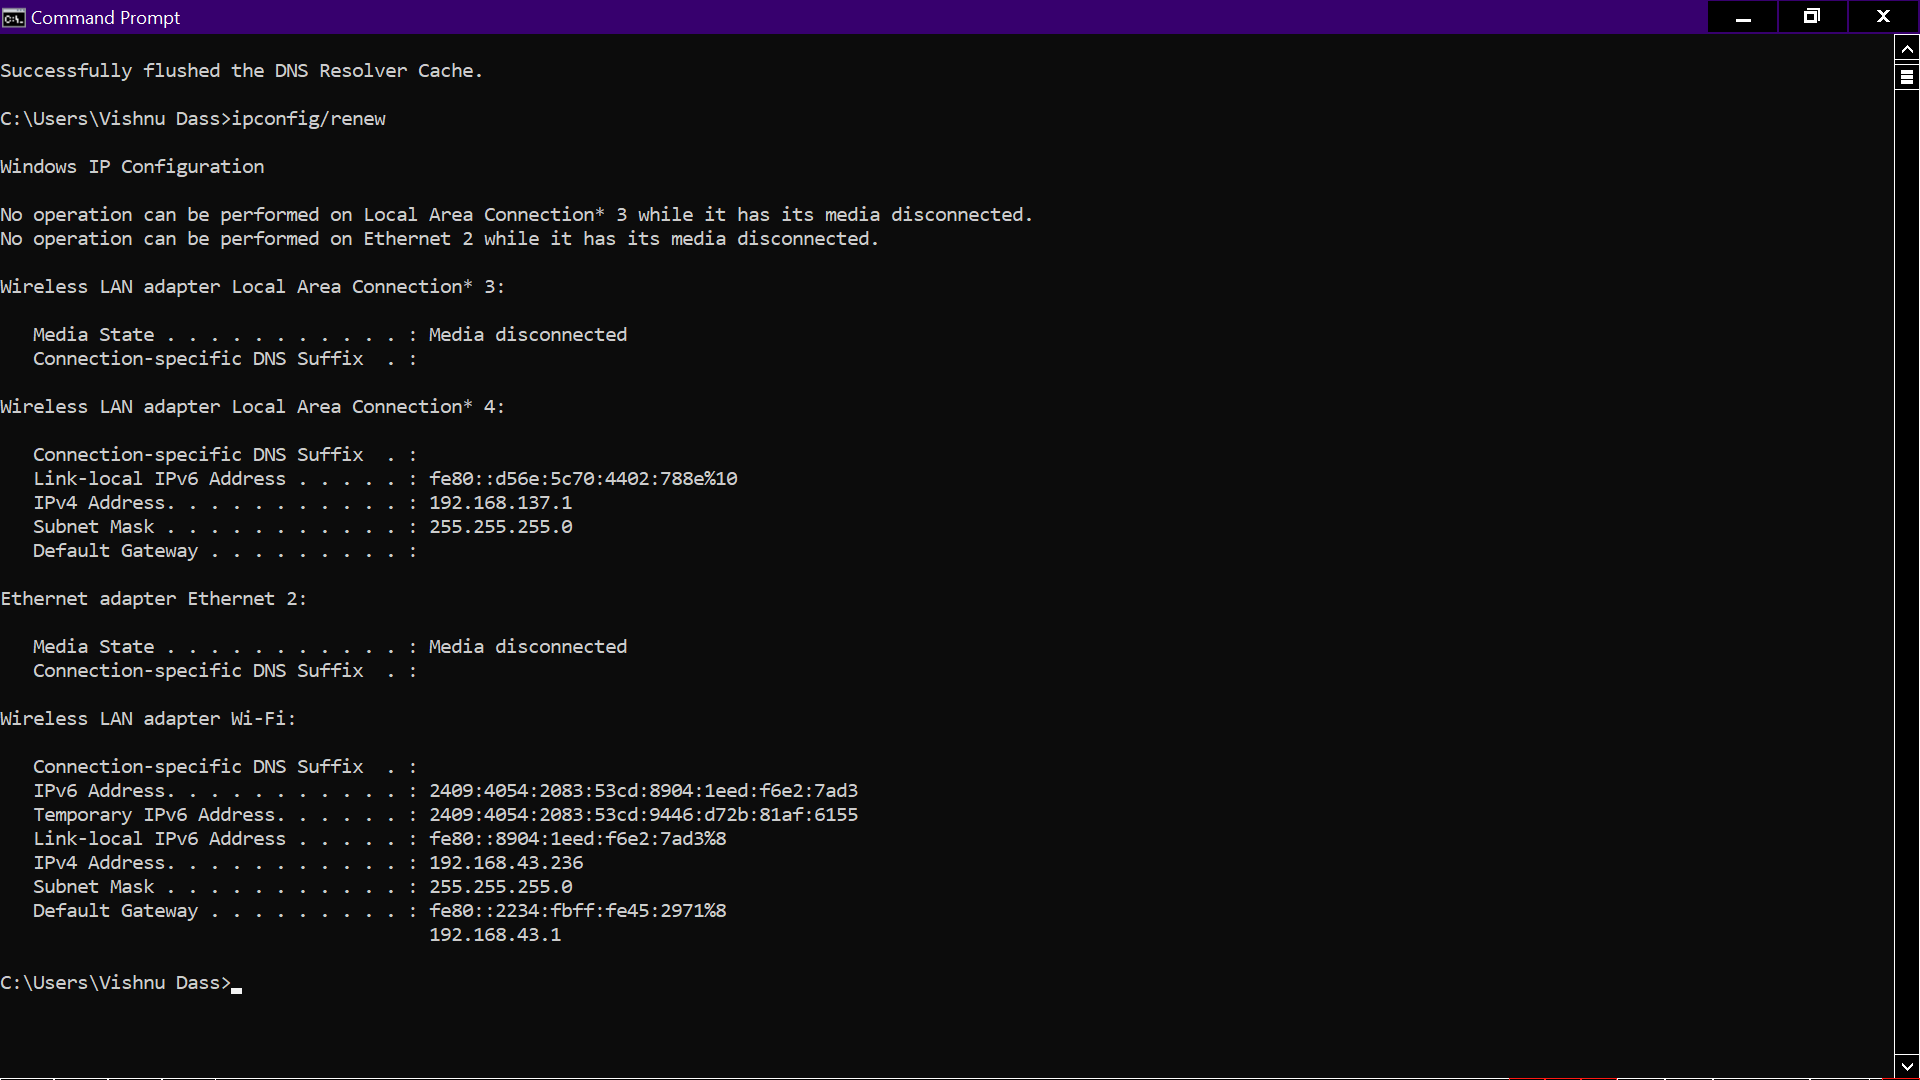
  4. Now you have to renew the IP configuration by entering this command ipconfig/renewScreenshot 150
  5. Restart your PC and see if the issue still persists.

If none of this methods work for you then there are chances that your network is strongly restrictive. We suggest you to swtich to your Mobile hotspot and then use discord.

Conclusion

After going through this article, we are sure that your issue might have been fixed by now. These methods were tried by our team and they really work. In case you tried all these methods and still get “RTC Connecting Discord” please tell us in the comments section. We will surely help you there.
Fix: uTorrent Not Downloading Or Connecting To Peers

0

After getting few good movie recommendations you decided to them but after waiting for some time you found that your uTorrent not downloading? This can be really annoying, mainly because this is an issue with your uTorrent app settings than with your Internet connection. In this article, our tech geeks suggested some ways that you can use to fix uTorrent not downloading or connecting to peers’ error.

Let’s dive in!

u Torret

Undoubtedly uTorrent is a popular workaround across the world and helps you to easily share and download huge files effectively. However, uTorrent also has some drawbacks which stop uTorrent normal working flow. Below is the list of some causes for the uTorrent download stuck issue.

  • Firewall or Antivirus program block internet connectivity.
  • The torrent you wanna download may be a dead torrent.
  • Your internet service provider blocks uTorrent.
  • The VPN or Proxy, you’re using may be incompatible with uTorrent.
  • The issue with your internet connections.

These are the potential causes of uTorrent various issues. Now it’s time to talk about how to get rid of uTorrent download stuck problem.

Contents

How To Fix uTorrent Not Downloading Issue?

Whatever the reason is, the following fixes will let you fix the issue.

1. Permit uTorrent To Run Through Firewall:-

Sometimes Firewall or Antivirus programs block the uTorrent because of multiple reasons. The most common reason that they consider uTorrent as a threat and perform their basic tasks of blocking threats.

Windows Firewall:-

Mostly uTorrent automatically adds an exception to run through the firewall. But sometimes this fails because of the third-party antivirus programs. To manually allow uTorrent to run through the Firewall, go through the below-given steps.

  • Head to the Window search bar and search for Firewall.
  • Click on Firewall & Network Protection.
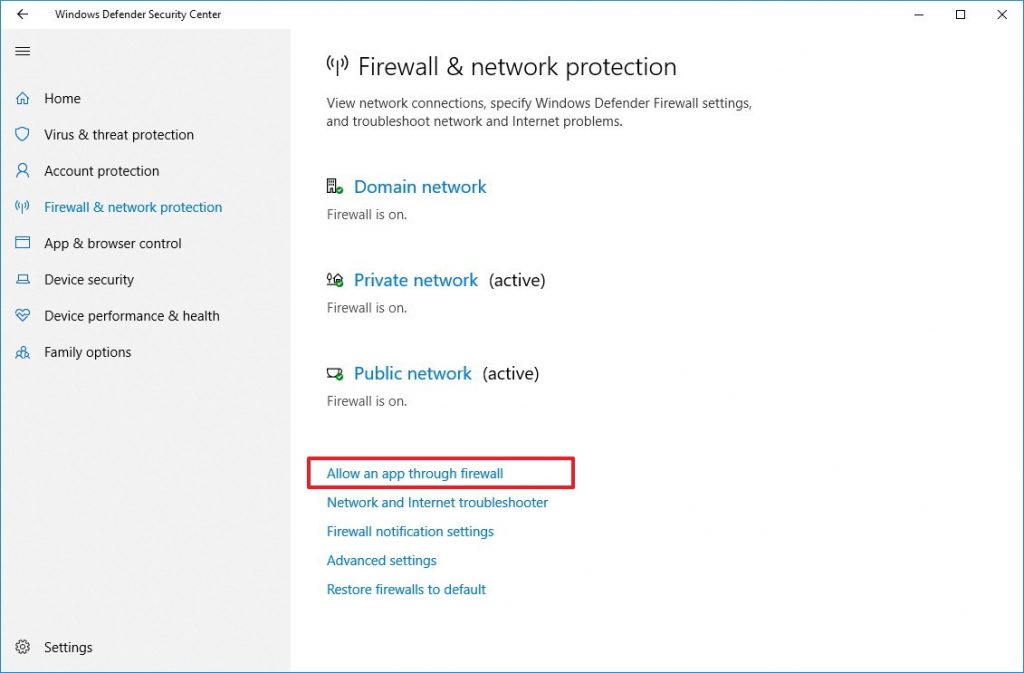
  • Tap on Allow an app through a firewall option, the following picture will help you learned this step.

allow an app run through windows firewall

  • Choose Change Setting and find the uTorrent. Click on Save when you marked both the public and domain.

Antivirus Software:-

Antivirus programs can also be the reason of block uTorrent. We’re going to allow uTorrent to run over the Avast antivirus. If you’re using another antivirus then the steps can vary.

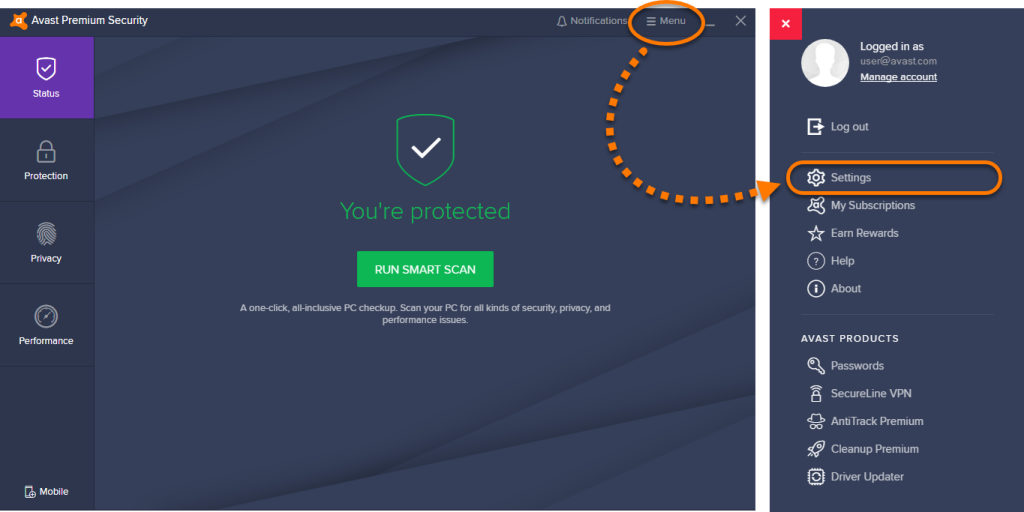
  • Launch Avast and click on Menu>Settings.

v1 menu settings

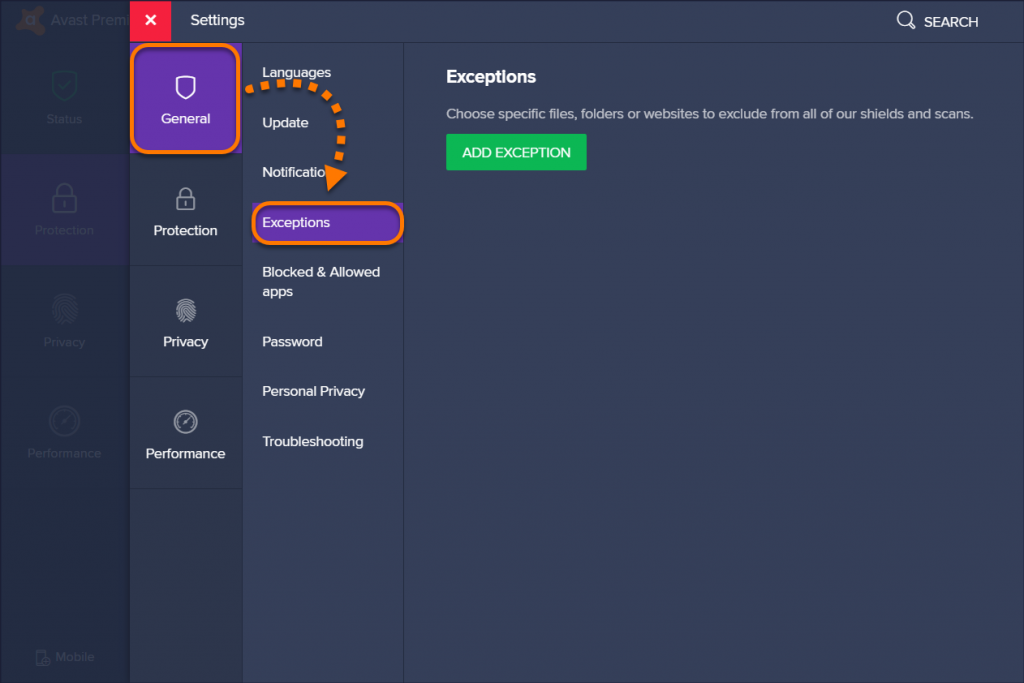
  • Make sure the General tab is chosen, then click on Exceptions.

v1 general exceptions

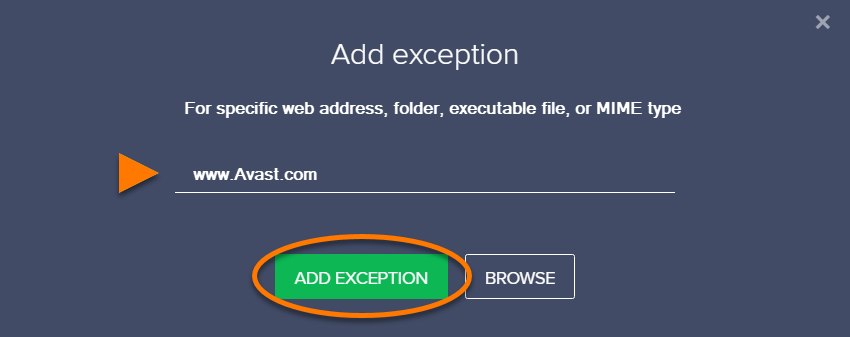
  • Tap on Add Exception button. You can add an exception in two ways:

v1 add exception

    • Enter the uTorrent URL or the file path. Then go ahead by clicking on Add Exception.

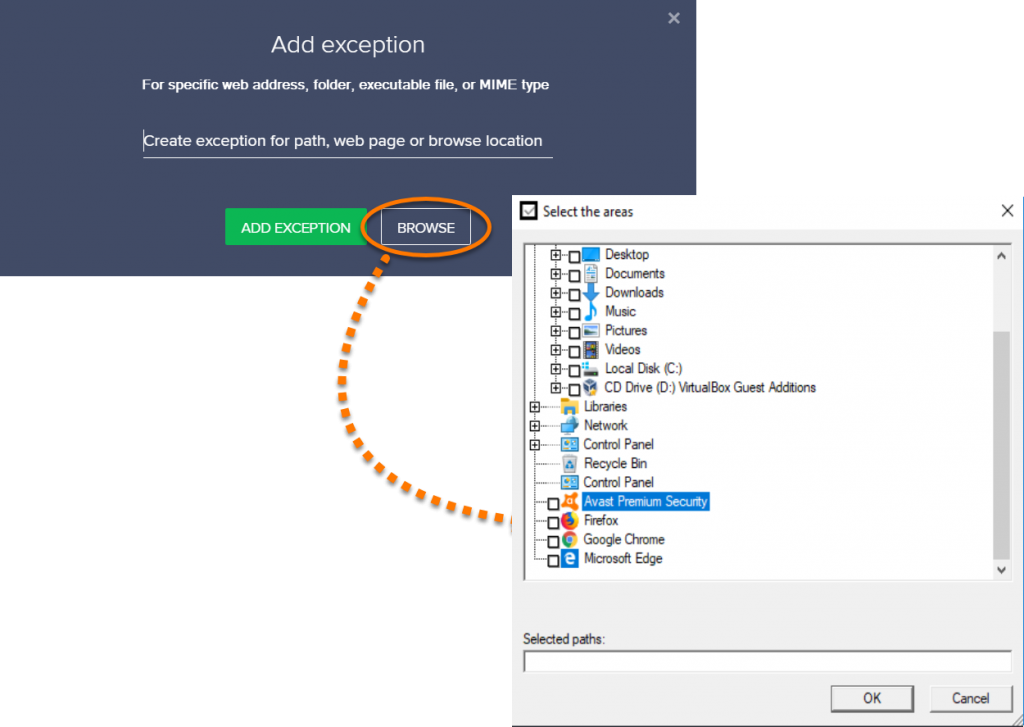
    • If you want to browse then click on browse option and choose the uTorrent folder.

v1 browse

Now, you’ve successfully added uTorrent in the exception list.

2. Update Outdated Tracker:-

This issue can also occur due to outdated trackers or seeders. Let’s follow these steps to update trackers.

  • Open uTorrent and right-click to see Update Tracker, and click on it.
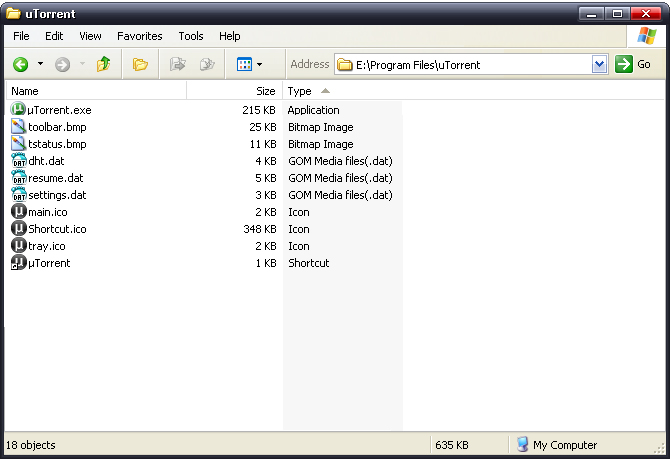
  • If the above method doesn’t work then quit uTorrent, and enter %APPDATA% in the search bar, search for the uTorrent folder and delete the file name resume.DAT.

388372655

3. Use VPN:-

If your internet service provider is blocking uTorrent, then definitely you will face issues like uTorrent no downloading or connecting to peers issues. You can simply fix this by using to VPN, there are a number of VPN available to use such as Nord VPN, SurfShark, Express VPN, and many more. Choose any of them to bypass ISP restrictions.

VPN

4. Run Quick Test In uTorrent:-

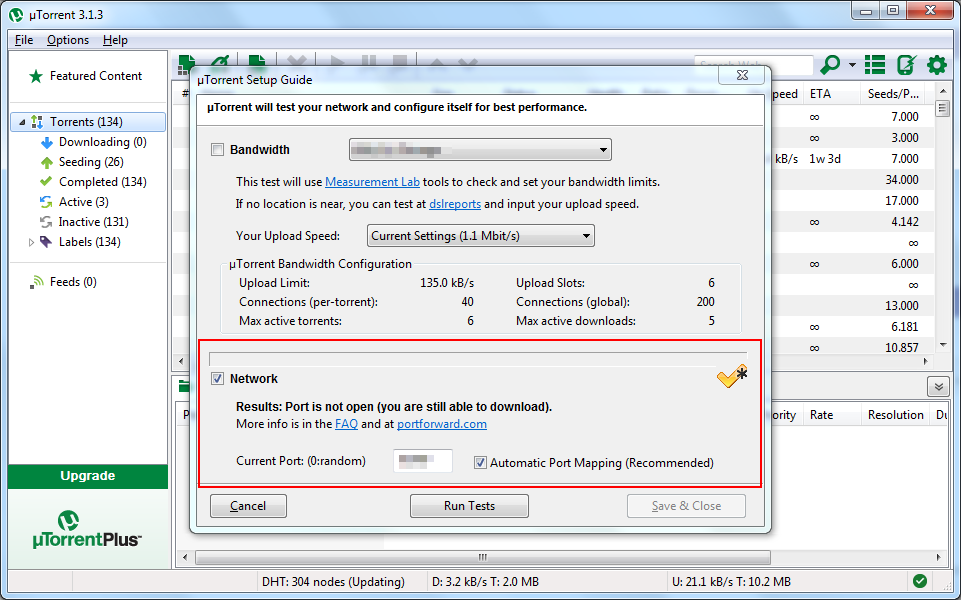
uTorrent settings can also be the culprit of this problem like ports isn’t in a working state. These uTorrent settings can be fixed by running a quick test in uTorrent.

  • Navigate to the Options>Set up Guide.
  • Tap on Run Test.

When you click on run test, uTorrent will check your connection, and if any glitch is found then it will automatically fix settings.

OdS5GPN

If still your problem not get resolved then worry not, we’ve a few more solutions you can try.

5. Change uTorrent Incoming Port:-

These steps will let you change the incoming port of the uTorrent.

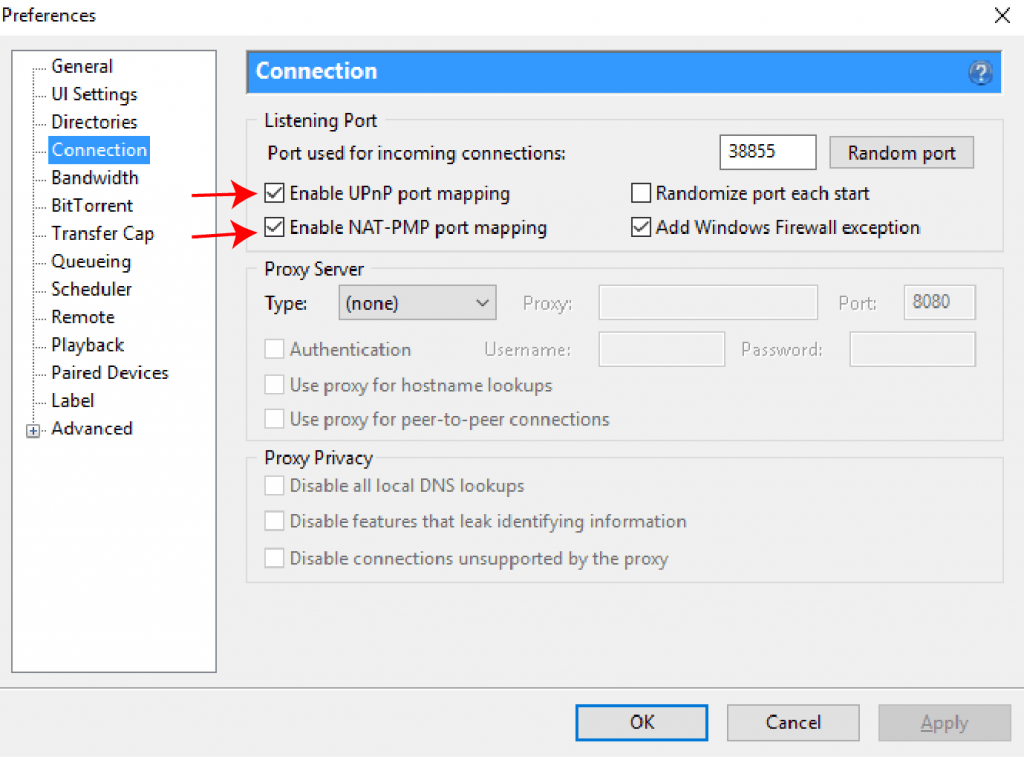
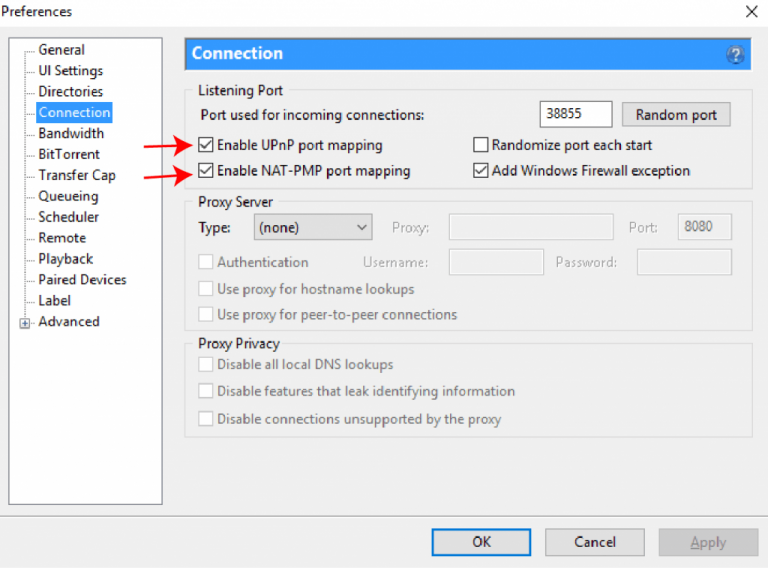
  • Navigate to the Options>Prefrences.
  • Select Connection.
  • Increase or decrease the existing value with 1, and check whether your download gets started or not.
  • To ensure you get the faster download speed, mark both Enable UPnP port mapping and NAT-PMP port mapping, click on Ok to save settings.

change port settings in utorrent

6. Pause And Resume Download:-

If your uTorrent downloads stuck at 0% then you can pause the download and resume it after some time. This will help you reconnect with the peer.

unnamed

7. Find Another Torrent File:-

If all the solution we discussed so far, fails to fix uTorrent not downloading issue. Then might be the problem with your torrent file. As you know that uTorrent is worked on peer to peer connection if your torrent file becomes dead then it is impossible to download it. In this scenario search for another torrent file with more seeds.

Bonus Tips:-

If you see your uTorrent not downloading, then with the above ways you can fix the problem. Torrent offers more than downloading files, you can also share your huge files with your audience using torrent. I always suggest you download the torrent file only from a trusted source, or if you are downloading files from untrusted sources then you should need to scan files for viruses before downloading.

If still, you have any doubts in your mind then you can share with us using the comment section. Please share this article with your friends, if you find this helpful. Thanks for reading.

Is TikTok Shutting Down In The US, UK Following India?

TikTok fans are losing it, after a report that claimes TikTok is shutting down. Willing to know whether it just a rumor or TikTok is going pack up, then read this carefully to find out yourself.

CaptureA Undoubtedly TikTok got so much fame within no time and it manages to become the most loveable app around the globe especially among teenagers. TikTok enables its users to impress the audience by making short videos. As a report issued by App Annie, TikTok secure the 7th position among the top 10 most downloadable apps worldwide. In India TikTok shutting down controversies risen as a result of YouTube vs TikTok fight, after that many Indian TikTok users begin reporting the TikTok app poorly on Google Play Store. The TikTok rating goes down from 4.5 to 1.2. However, after that Google analyzes the reviews and removed 90% of spam and negative comments.

TikTok holds more than one billion active users around the globe. So what do you think an application which receives so much love, can pack up overnight?

Will TikTok Shut Down in 2020 Rumors or Reality

Contents

Where The TikTok Shutting Down News Came From?

TikTok hasn’t released any official statement yet about the pack up. In today’s time of web, we see tons of rumors every day. You possibly seeing plenty of news circulating across the social media that TikTok is shutting down in 2020. TikTok fans need not be worried about the circulating news because as we talked earlier in this article, that TikTok hasn’t made any official statement regarding shut down.

A few weeks earlier the United States Army decides to ban TikTok from all the device issues by the United State government. The United States Army considers TikTok as a cyberthreat that’s why they have decided to ban TikTok. But still, if army personnel craves to use TikTok then they can use it on their devices.

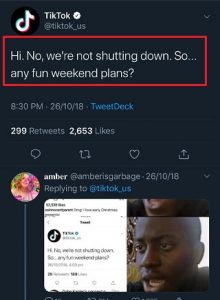
In the earlier days of 2018, a storm of TikTok shut down news has spread all over the social media. Immediately after the rumors, TikTok made a statement that we’re not going to shut down.

TikTok not shutting down oct218

By observing the fame of TikTok I don’t think that TikTok is going to shut down. We suggest you not to share such news that doesn’t come from official sources. This news is just like other shutdown news we are surrounded by.

How The US Could Ban TikTok?

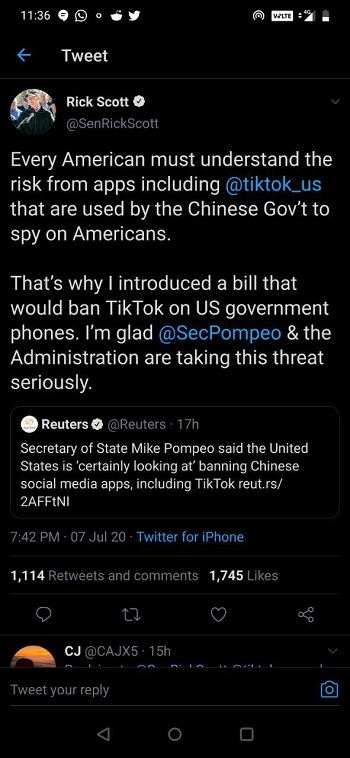
The US government banning Chinese apps, including the most popular video-sharing platform TikTok.  The situation between the US and China getting worse day by day. As per the result, Secretary Of State Mike Pompeo addresses the possibilities of the TikTok ban.

Recently India has banned 59 Chinese apps including TikTok, and Australia also has taken the same steps. So we can expect that the US will also do the same. The US Senator Rick Scott has also tweeted about the shut down of TikTok.

rick scott tiktok

Will TikTok shut down in the US as well? However, there is no official released yet and many spokespersons say that the TikTok ban is less possible in the US because US laws don’t have any precedent for any kind of software ban.

Why People Favoring The Shut Down Of TikTok:-

Many peoples across the world have removed the TikTok from their devices and suggest other TikTok users, to imitate the same. They are advocating the shutdown of TikTok because of some obvious reasons like national security issues, NFSW content, lack of child policies, etc. As per the investigation of American think tank “TikTok violating the national security laws and sharing users confidential information with the parent company ByteDance”.

download 25

The first time when you install TikTok on your device, TikTok will ask you to grant some permissions like location, Storage, and Camera. TikTok stores this information and forwards this information to ByteDance in china. As per the Chinese internet security laws, ByteDance has no right to deny to share this information with the government of China. Apart from the American think tank, many users also claimed the same issue. Meanwhile, TikTok denies all the claims and requests the users to keep patience. The plenty of videos posted on TikTok consists of various unacceptable social issues like provoking the rape, nudity, Abusive language, and many more. Because of these possible reasons, many peoples from across the world are supporting the shut down of TikTok.

maxresdefault 12

Is TikTok Shutting Down: Final Verdict:-

TikTok is not going to shut down. Several people spreading the TikTok shutting down news because TikTok found accused of violating child privacy laws, TikTok has paid millions of dollars as a fine and that’s the end of it. TikTok manages to become the favorite app of millions of users around the world mostly to youngsters. ByteDance is the parent company of TikTok that is a reputed company and manages to hold the worth of 74 billion. So as per my observations, I  don’t think that TikTok is going to shut down in forthcoming days. I hope now you have got the answer to all your questions.

In today’s post, I have concluded the answer to some frequently asked questions however if you have any other update that relates the shut down of TikTok then share with us. If this article worth the reading then share it with your loved once.

Uplay Not Connecting? Try These 5 Fixes [100% Working]

0

You were just to play the game on Uplay and found this notorious issue of play not connecting. Even after waiting for hours and trying again this issue still keeps going on. You have landed on this page as you wanted to fix this issue of Uplay not connecting now. You are going to discover new and easy methods to bypass this issue.

Before we dive into our main topic let’s give you a brief introduction regarding Uplay. Uplay is a game launcher very similar to steam, epic, and origin. It is actually a game distribution service where you can purchase, download, and play games in a very friendly environment. It is a very big hub for the gaming community and is very popular among gamers.

jkl Its parent organization is Ubisoft.  Sometimes users get stuck in the situation Uplay stops connecting and gets some connection problems. If you have also encountered such a problem then this article is surely for you. You can go through this article if your Uplay is having connection problems. Some messages that are displayed mostly on user’s screen are :

  1. Uplay connection lost a Ubisoft service is currently unavailable
  2. Connection lost there seems to be a problem
  3. Uplay looking for patches then connection lost

Contents

Why does this Error occur?

Here are some reasons that might be responsible for this issue with Uplay.

  1. Outdated Windows Firewall
  2. Malicious Host Files
  3. Running Too Many backgrounds files
  4. Problems in settings of Uplay

All the solutions to these reasons are mentioned below. You can go through them to fix the issue.

How To Fix Uplay Windows PC Connection Issues

Here are some working methods to fix this issue of Uplay not connecting. Let’s Begin:-

1. Update or Disable Windows Firewall

The first thing you should try is to set up your firewall. If it is disabled then you need to enable it and if it is enabled then check if it has got an updated version. Here are the steps that will guide you in enabling the firewall.

  1. Press your windows button and type windows firewall.rty
  2. Click the “open” on-screen of your computer.
  3. Choose customize settings switch the toggle from On to Off.lkj

2. Reset Host Files

Usually, windows use host files in the mapping of IP addresses to hostnames. Malicious files are also common to these host files. These malicious files result in certain internet connection issues. Follow these steps to resolve this issue:-

  1. Firstly you need to download the default compresses host files online.
  2. Now you have to extract the file and copy it to this location C:\Windows\System32\drivers\etcScreenshot 125
  3.  And Now replace the original file and you are done.

3. Disable Background Programs

Sometimes other applications and programs running in the background might also be the reason behind this issue. You can disable all the applications running in the background and then try connecting Uplay. Follow these steps to disable all applications running in the background.

  1. Press and hold Win+R to open up Dialog Box.Screenshot 90 e1591676448684
  2. Type Msconfig and press enter09
  3. Select a selective startup and also uncheck load startup items.oiu
  4. Save the changes and you are good to go.

4. Flush DNS Files

The main function of DNS is to keep the IP addresses of web servers that you have visited recently. Some of these files get old and damaged stopping the internet connection. Flushing DNS files might help you in fixing the issue of Uplay not connecting. Here are steps to Flush DNS files.

  1. Open Dialog Box by pressing WIN+RScreenshot 90 e1591676448684
  2. Type CMD and Run command prompt as administratorScreenshot 126
  3. When CMD opens type ipconfig /flushdns and hit enter. Your DNS has been flushed and you are good to go.Screenshot 127 e1591677814178

5. Change Settings

If you have turned On option of “Always start Uplay in Offline mode”. Then you need to turn it off. You can also try changing proxy settings. Here are the steps that you need to follow.

  1. Run Uplay on your device.Screenshot from 2017 12 29 19 14 25
  2. Go to settings and then uncheck the option of “Always start Uplay in Offline Mode”.poi
  3. If there is any flaw in settings then you can also change the settings by clicking Change Proxy Settings.

FAQs Regarding Uplay

Some common questions that come into the user’s mind while facing this issue of Uplay not connecting.

Why Won’t My Uplay connect?

The connection server is blocked. You need to add play to your exceptions list. This article covers all methods to fix this issue.

How Do I Fix Uplay?

Go and check if your firewall is blocking the way for Uplay. Try Flushing your DNS.

Conclusion

Uplay is really a nice platform to show your gaming skills. If you are skilled enough you will surely be recognized here. The good thing about Uplay is that it is very user friendly and provides you extensive support for its products.

So, guys, these were some working methods that would help you in fixing this issue of Uplay not connecting. Though we have added screenshots for your convenience but still if you are facing any difficulty in implementing these steps then please feel free to tell us in the comments section. We will surely help you further.

How To Install RLcraft On Minecraft [2 Ways]

0

Mine craft is an amazing sandbox game. RLCraft is a mod pack that consists of 120 separate mods bundled and tweaked by shivaxi in order to create a challenging Minecraft world. It runs on Minecraft version 1.12.2. There are multiple ways of launching RLcraft. These are using Twitch Installer, using Technic Installer, and by manual steps. In this blog post today we are going to discuss “how to install RLCraft” methods in detail.

nqXlqcy e1591440266857

Contents

RLCraft Minimum Requirements

maxresdefault 1

There are some minimum requirements that you need to fulfill before the installation of RLCraft. Have a look over these requirements

FORGE- The latest version of Forge will work for you and you need to set up that. The current latest version is 1.12.2. The older version will break older mods in the mod pack.

Parameters- Now let us have a look at some of the parameters. The default allocated RAM of 1 GB is not really enough. We would recommend you allocate 3 to 4 GB’s of RAM. You do this by enabling JVM arguments and changing “-Xmx1G” to “-Xmx4G”.

My JVM structure looks like this.
-Xmx4G -XX:+UseConcMarkSweepGC -XX:+CMSIncrementalMode -XX:-UseAdaptiveSizePolicy -Xmn128M

Files- If you are going to do the manual installation using the server pack you have to ensure that there is nothing in your Mods or configuration folders. Copy the folders and into your Minecraft Directory.

How To Install RLcraft – Minecraft

Go through these methods and follow the steps to install RLcraft easily. Let’s go:-

1. Installing RLCraft Using Twitch Installer

Installing RLcraft using a Twitch installer is probably the best and easiest way to RLcraft on your device. But you have to make sure that your installer is working finely. Go through these steps to install RLcraft using Twitch:-

  1. Visit the link https://www.twitch.tv/downloads and start downloading the twitch app for windows.studio main app 1x 6d38ef5ccb97a651e9e0
  2. Now open the twitch launcher and move to MODS at the top.2744534 06 e1591439871677
  3. Left-click on Minecraft and Browse Modpacks.
  4. Type RLcraft in the search bar given at the top.
  5. Click on Rlcraft to install it.maxresdefault 13 e1591439970736
  6. After installing Rlcraft go to mods and click on Minecraft.
  7. Click Play and you are all set to play RLCraft.

2. Installing RLCraft Using Technic Launcher

Technic launcher is also very easy to use but it has only one issue that you have login and logout on this installer every time if you are using another launcher too. You will need to increase your device memory to install RLCraft using Technic launcher. Here are the steps that you need to follow to install TLCraft using Technic Launcher:-

  1. Install technic launcher from this official website https://www.technicpack.net/download.image1 e1591440068218
  2. When Installed, go to modpacks at the top.
  3. At the top left side search for Shivaxi RLCrafta0632c55f092a1ca e1591440183899
  4. Click on shivaxi RLCraft and install it.
  5. When it is installed, you are ready to play it.

Some Tips & Starting Hints For RLCraft

We have come up with some really working Tips that would help you from die-ing so early.

Choose Your Biome Wisely – The new temperature and heat mechanics with biome specific mobs setting up a shop in the middle of the desert isn’t the cool idea. Also, setting up yourself in the mountains during winter is a bad idea. So you need to choose your Biome wisely before taking any other step.

Exploring Can Save You– A major part of this mod is built around exploration. You would very likely come to abandoned shelters with some important and very useful loot and gear.

Start Levelling Immediately – You might have noticed that you need your skills to be 4 for even using shears. Your faring and gathering skills also need to be high. Skillable is accessed from your inventory, while Level Up! can be accessed by pressing L.

Don’t Sleep In Open- You cannot expect a good sleep if your bed is in open. Due to new sleeping mechanics, there is a risk of being attacked during sleep. So you have to make sure that the place where you sleep is well sheltered and your surroundings are lit up properly.

Top Priority Items– There will be a few things always that you will be willing to try immediately. You may require a canteen or water bottle to drink. So you need to kill some cows or search some sand to smelt to Gas. You will also need a flint and a matchbox to light up torches. Matchboxes are easy to obtain. So you can try crafting paper by sugarcane.

For crafting Cobblestone and fireplaces you can lit it up by right-clicking the fireplace with sticks a few times. Also if you are so hot then the water is the easiest thing to cool down. Crystals are great tools and weapons for earlier use once you have 4 levels into the attack. Advanced Weapons cannot be crafted from crystal.

The Final Take

RLCraft is indeed a great MOD by Minecraft Users. You just need to use it wisely. We have not included manual installation of RLCraft because it a way to difficult. Though we covered the other two methods in detail.

In this article, we covered the easiest methods with the easiest steps to install RLCraft using Twitch and Technic installer. These steps are very easy to follow and we hope that you will be facing no difficulty in installing it. If you are facing any issue then please feel free to contact us in the comments section. We will help you for sure.

WiFi Keeps Disconnecting? Here are 10 Ways to Fix it

0

Be it your workplace or your home you always need your Wifi connection stable to run your device and keep it connected to the internet. You might have noticed that some times your device disconnects from Wifi and then reconnects automatically. Sometimes it doesn’t even reconnect. This is a very unpleasant problem that occurs very frequently and causes an unnecessary disturbance. Today in this blog post we have come up with different solutions to fix WiFi keeps disconnecting and reconnecting issues on your PC. You can go through these steps to fix this annoying issue.

Contents

Why does your WiFi disconnects Randomly?

There cannot be a single reason behind this issue of WiFi disconnecting again and again. We are listing some common causes behind this issue:-

  • Insufficient Range of Hotspot
  • Overloaded WiFi Connects. Usually, this happens in crowded places.
  • Logging in and out several times a day
  • Overlapping of WiFi connections
  • Outdated WiFi network adapters
  • Internet Service Provider Issues

How To Fix WiFi Keeps Disconnecting Problem?

Here are the different methods to fix this issue. Let’s begin.

1. Forget WiFi Network And Reconnect It

Forget your Wifi network from Wifi settings and then reconnect it again might fix this issue. Here are the steps to do it.

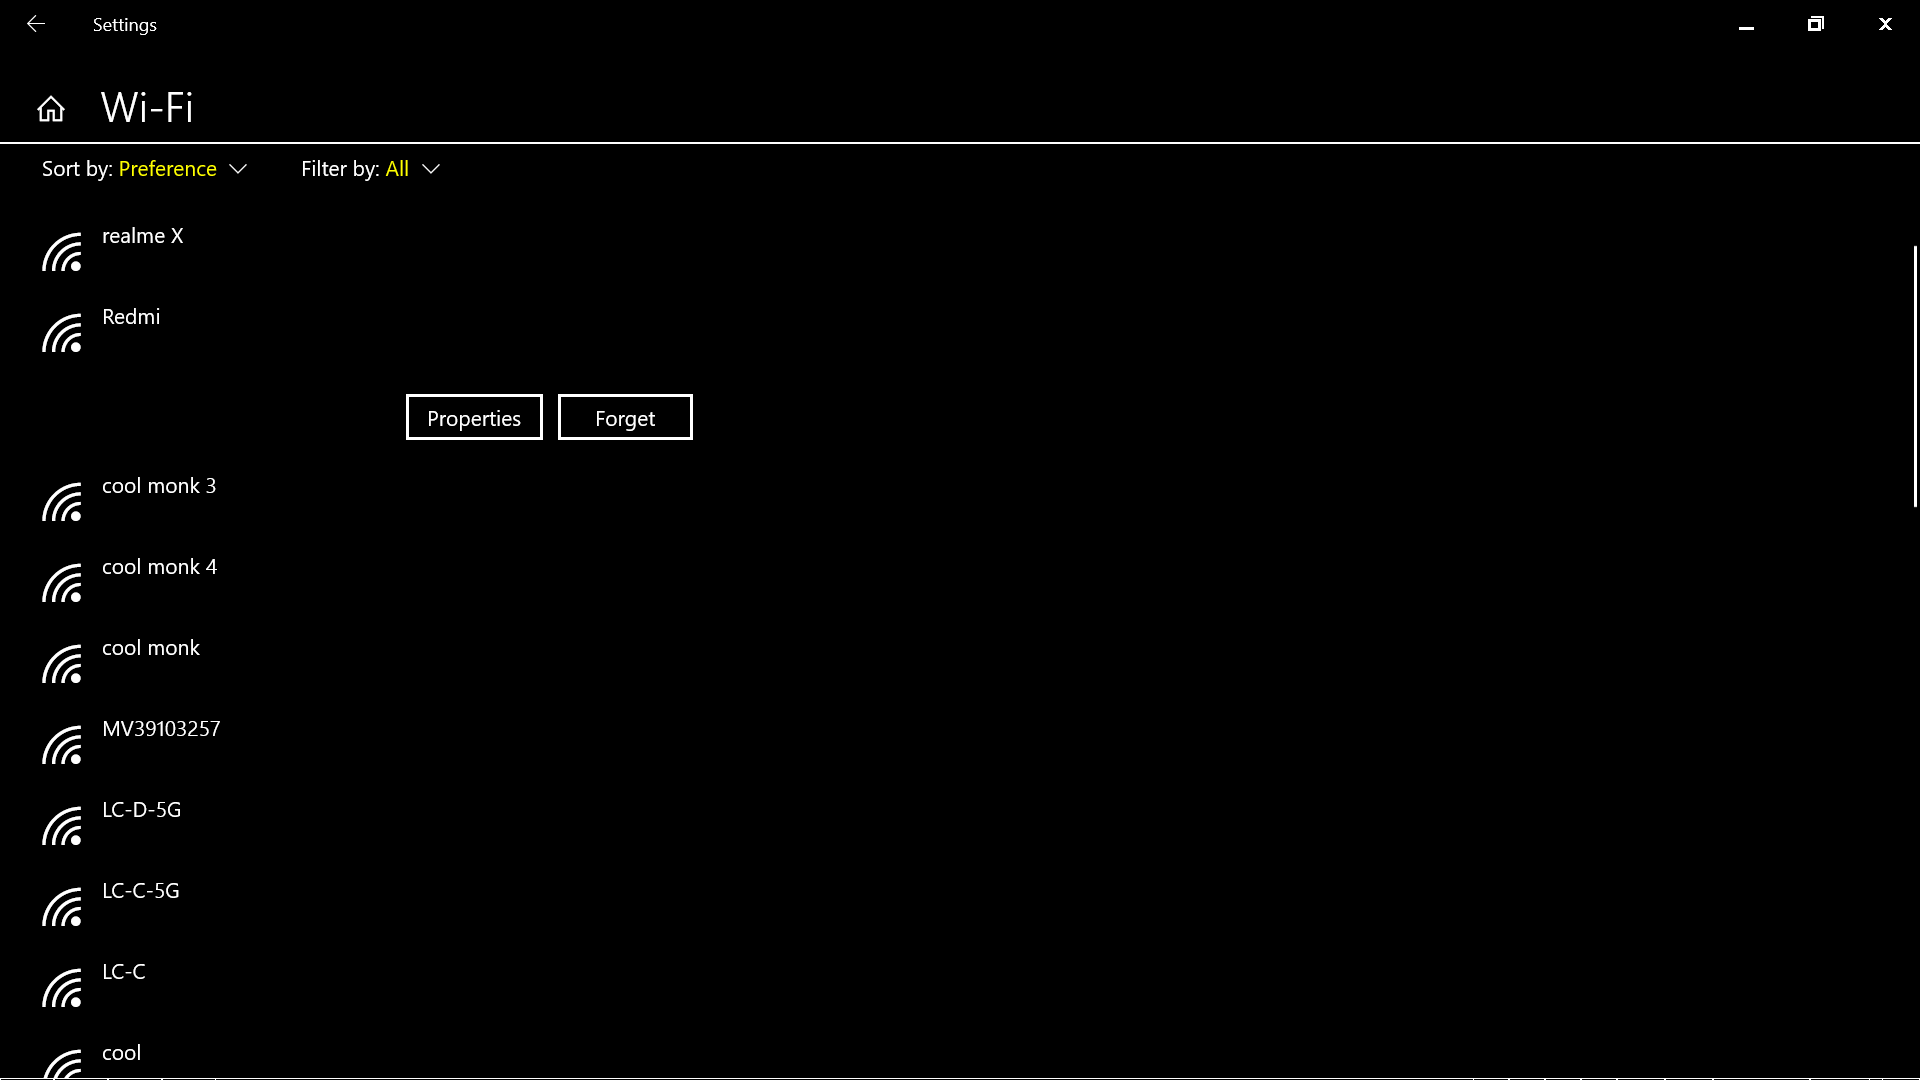
  1. Go to Settings and Find WiFi settingsScreenshot 99
  2. Find your paired networks and then forget them all.Screenshot 100 2
  3. Now you can connect your desired network.

2. Reboot Your Device And The Router

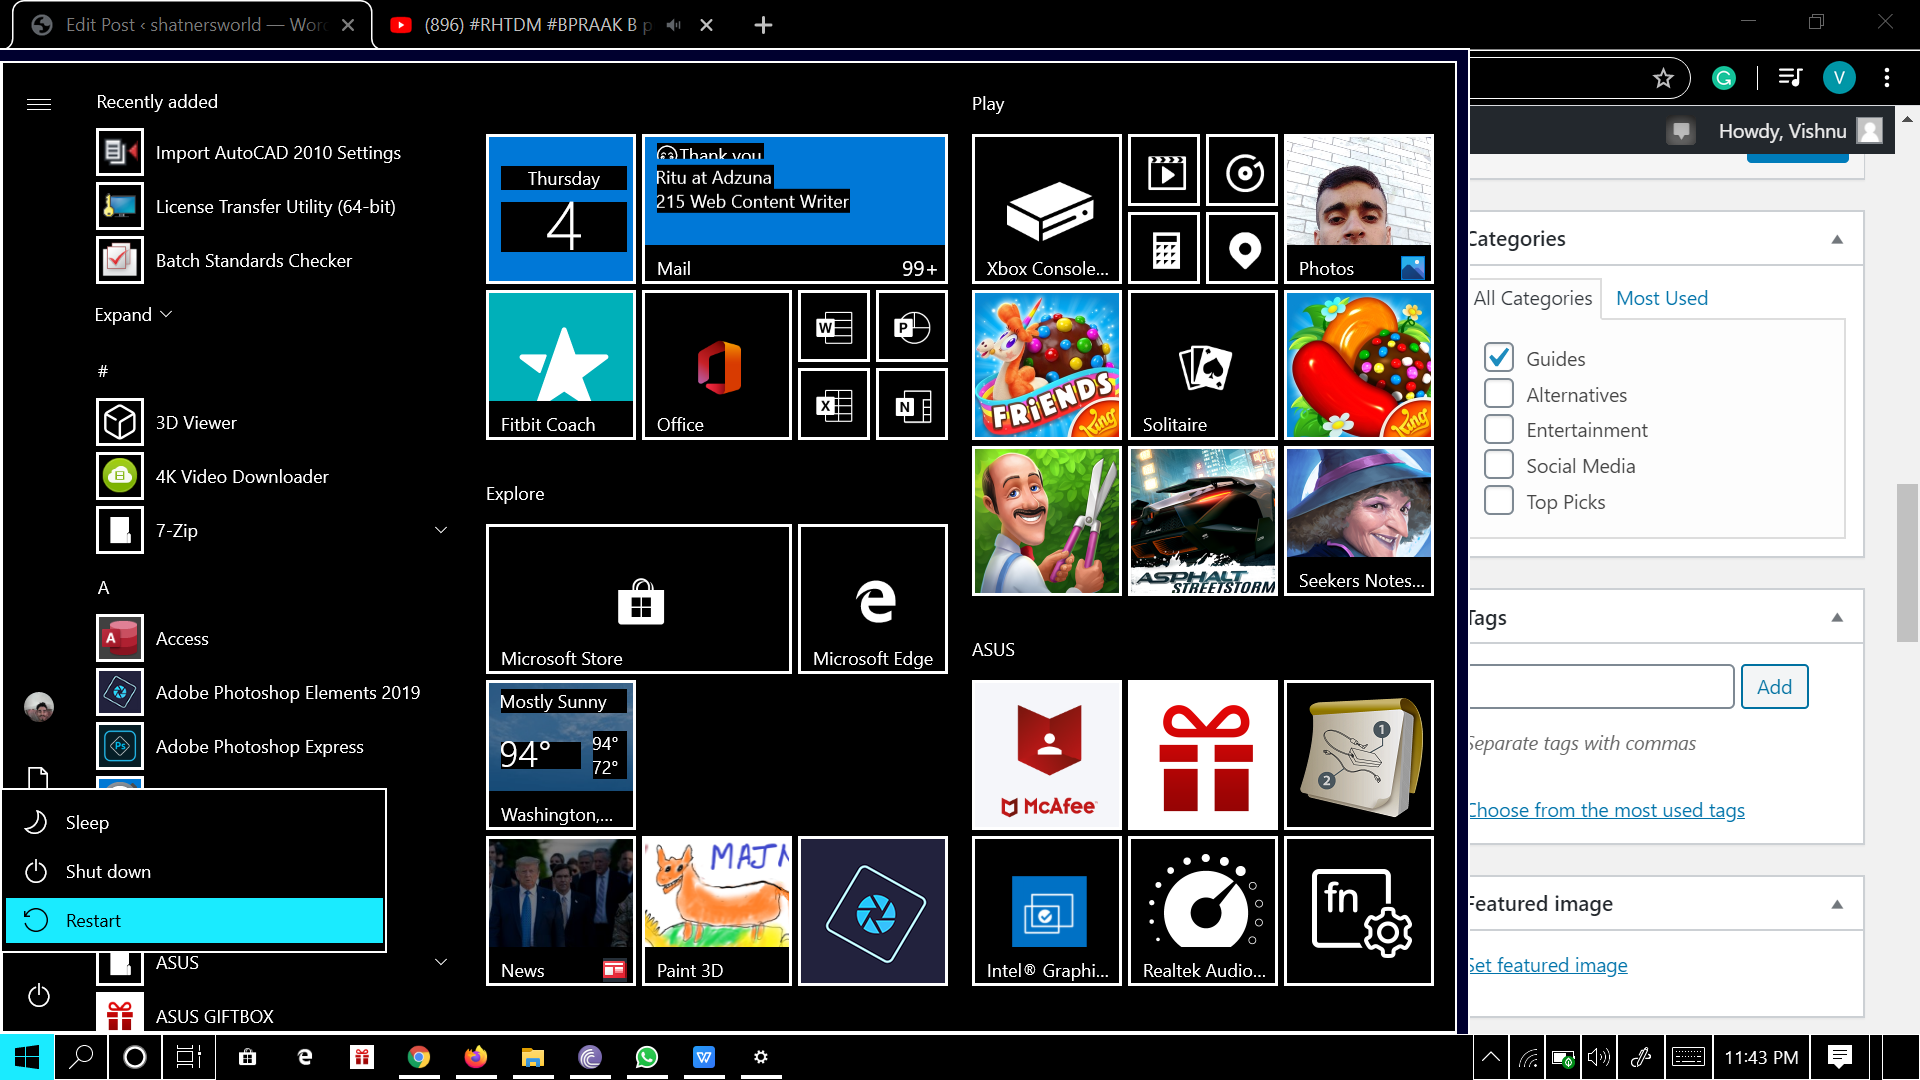
You can try restarting your device be it mobile or a PC. And also restart your router by simply pressing the power button.  This trick actually looks simple but works most of the time. You Can give it a try.Screenshot 101

3.  Update Your Wireless Card Driver

Using an ethernet cable connect your PC to router and update your Wireless card driver. Some times this is also the cause behind the problem.

4. Try Changing WiFi Network Mode

Faulty drivers in Windows 10 might also be the problem behind your WiFi disconnecting issue. You can log into your router configuration page and change the wireless band from 802.11n to 802.11g.

5. Change Scan Valid Interval

You can change your scan interval In these simple steps.

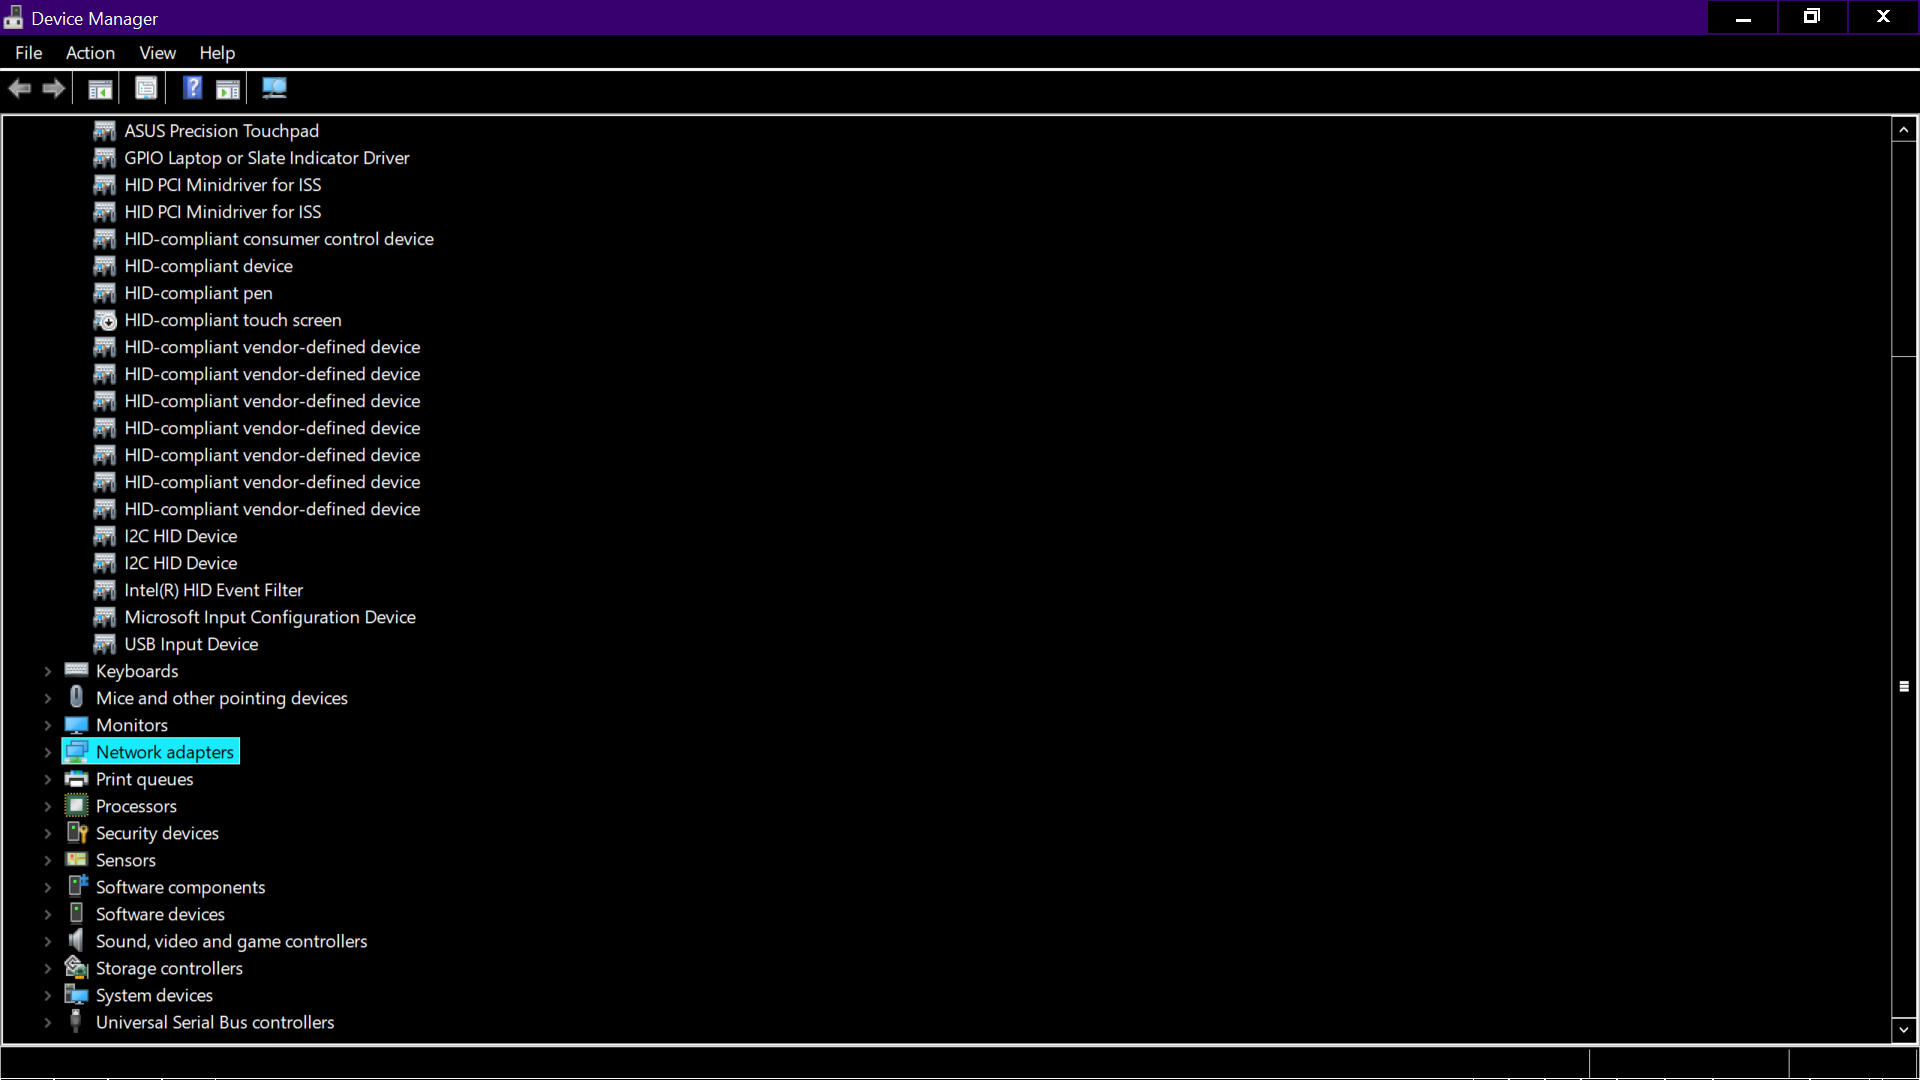
  1. Go to device managerScreenshot 102
  2. Move to network adapters.
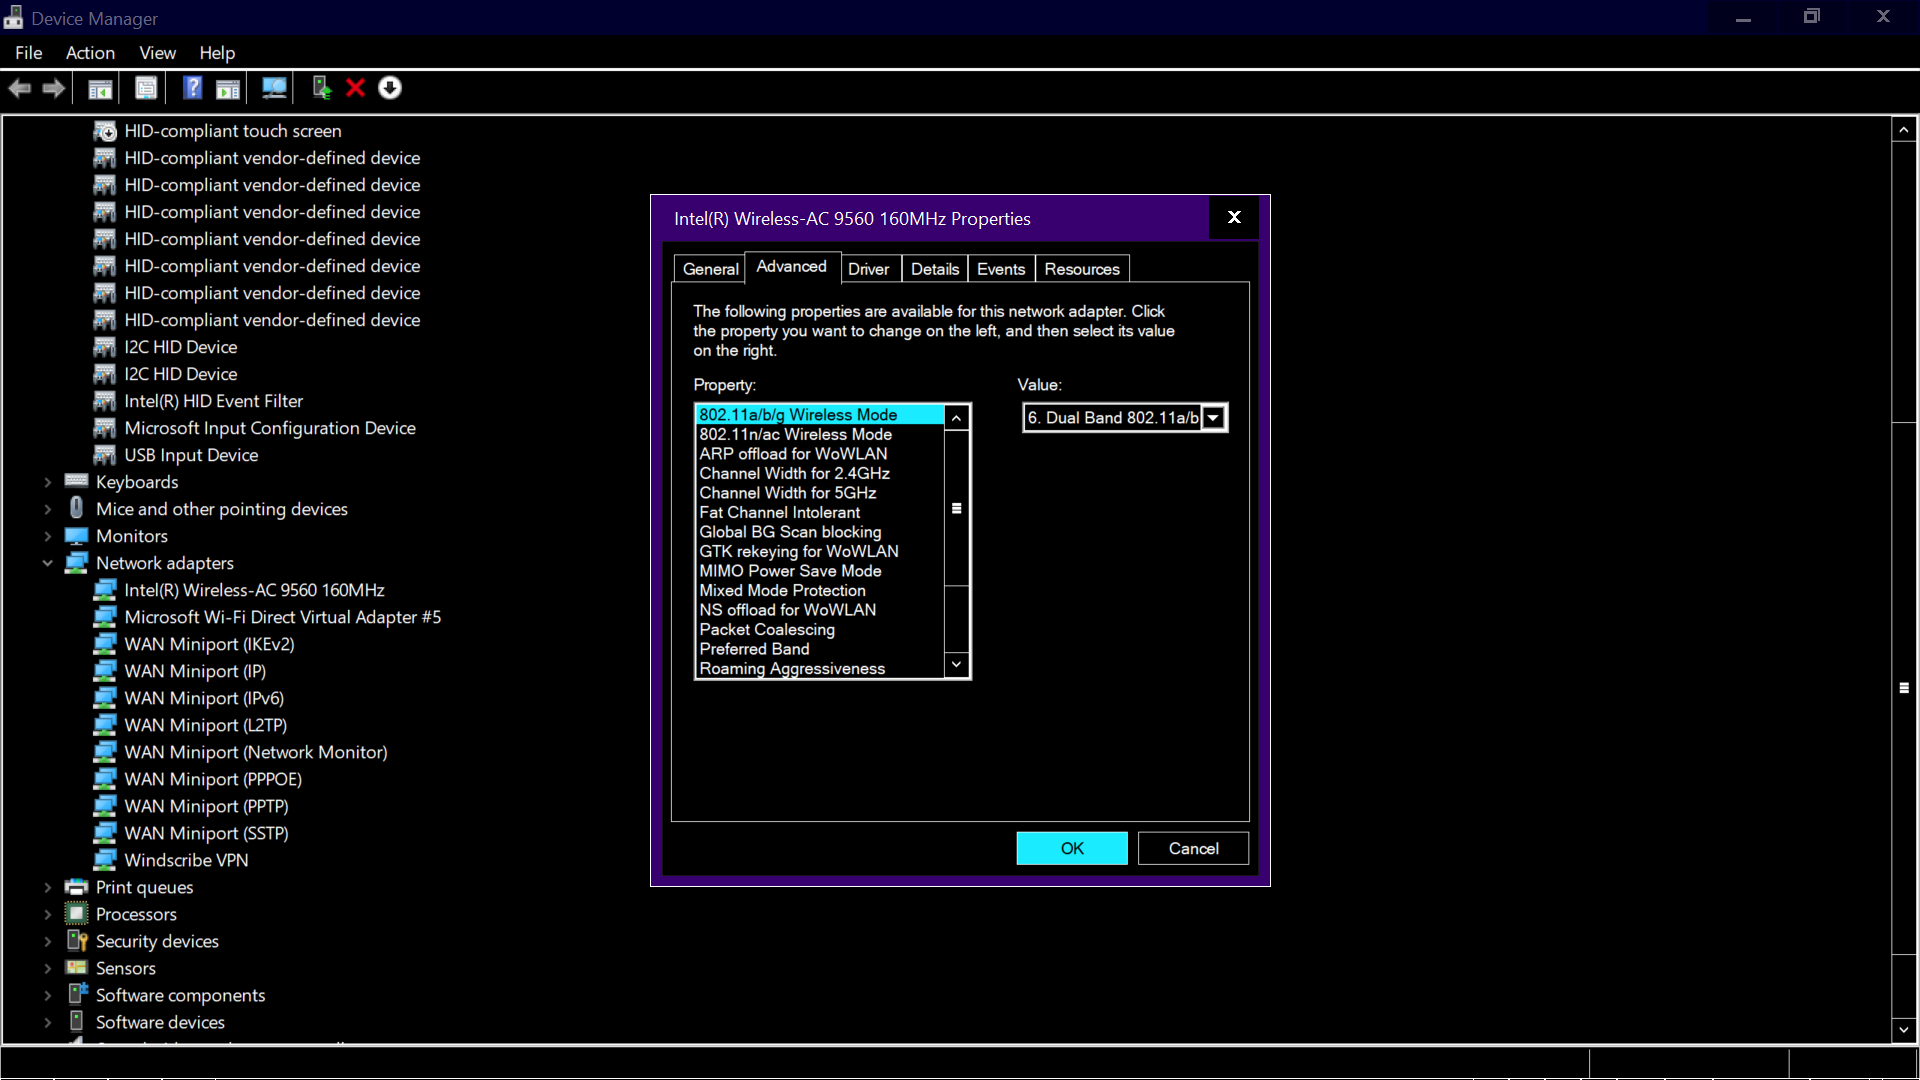
  3. Double click on your wifi adapter and select advanced tabScreenshot 103
  4. Change the”Scan valid interval” from 60 to 120.

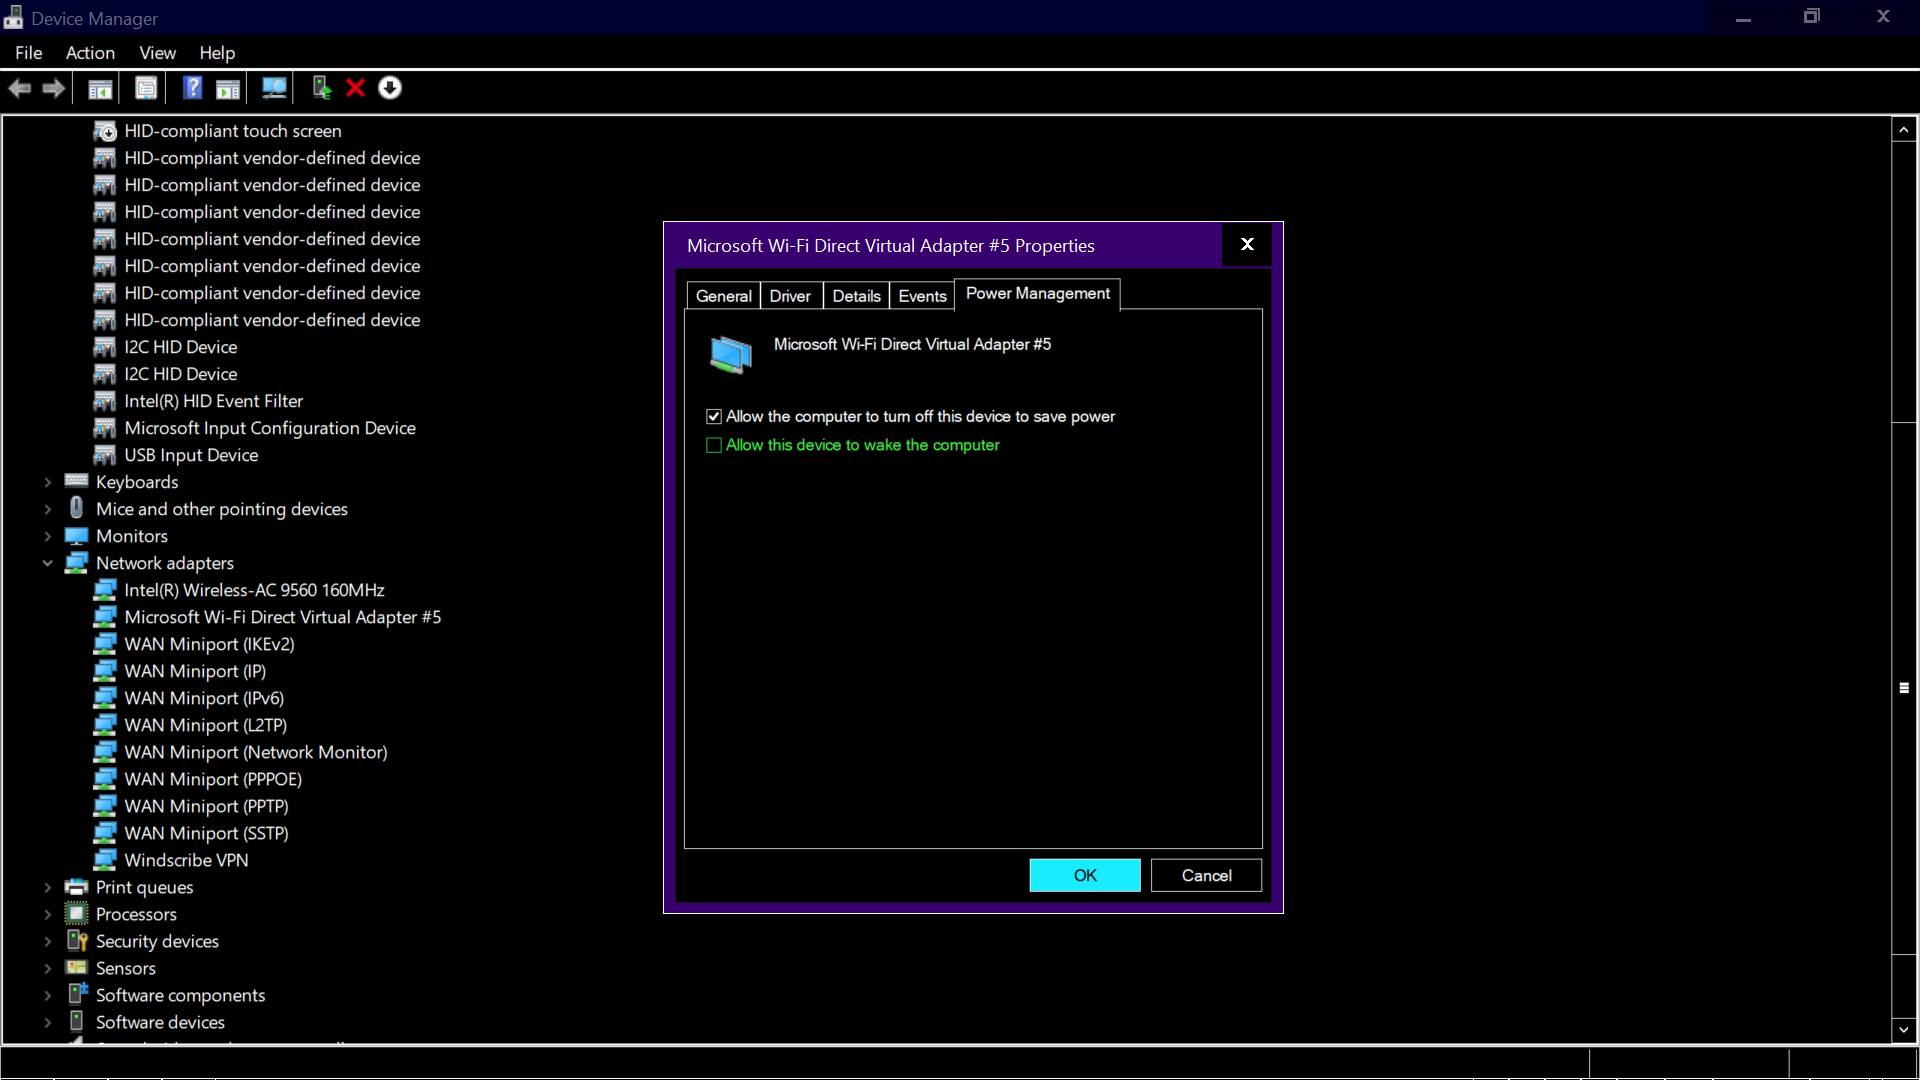
6. Disable Power Saving Feature For WiFi Card On Your PC

Sometimes windows try to save power when your network is not in use. You can turn off this feature manually in simple steps. You need to disable the power saver for the network adapter.

  1. Run the Device Manager.
  2. Move to the Network Adapters section.Screenshot 102
  3. Hit double-click on your active WiFi network card.
  4. Select  Power Management.
  5. Remove the flag saying “Allow the computer to turn off this device to save power“.Screenshot 104 1
  6. Press OK to save settings.

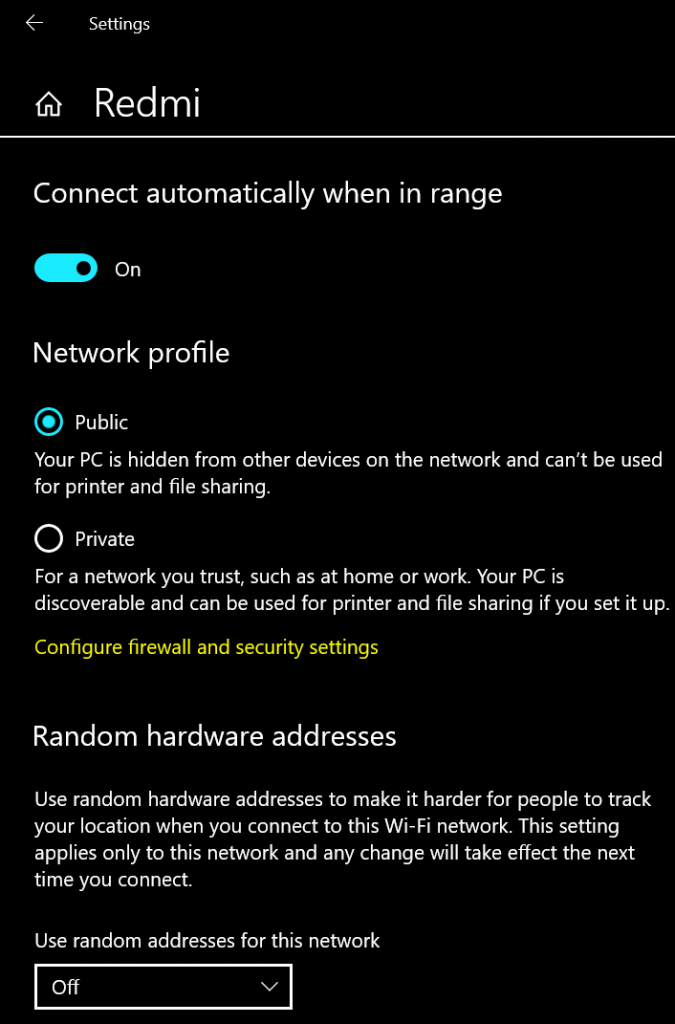
7. Switch To Private Profile On Windows 10

Changing your network profile from public to private also helps you in fixing this Wifi keeps disconnecting issues. You can go through these simple steps to change your network profile.

  1. Click on the WiFi symbol.
  2. Select the name of your network.
  3. Select Properties.
  4. Press Private.Screenshot 106

8. Come Close To The Router

You might be far away from the range of the router which might be causing the problem. Usually, the router’s range is quite well but it totally depends upon the quality of the signal. So you are advised to keep your device in the minimum range of the router.

9. Run Network Troubleshooter

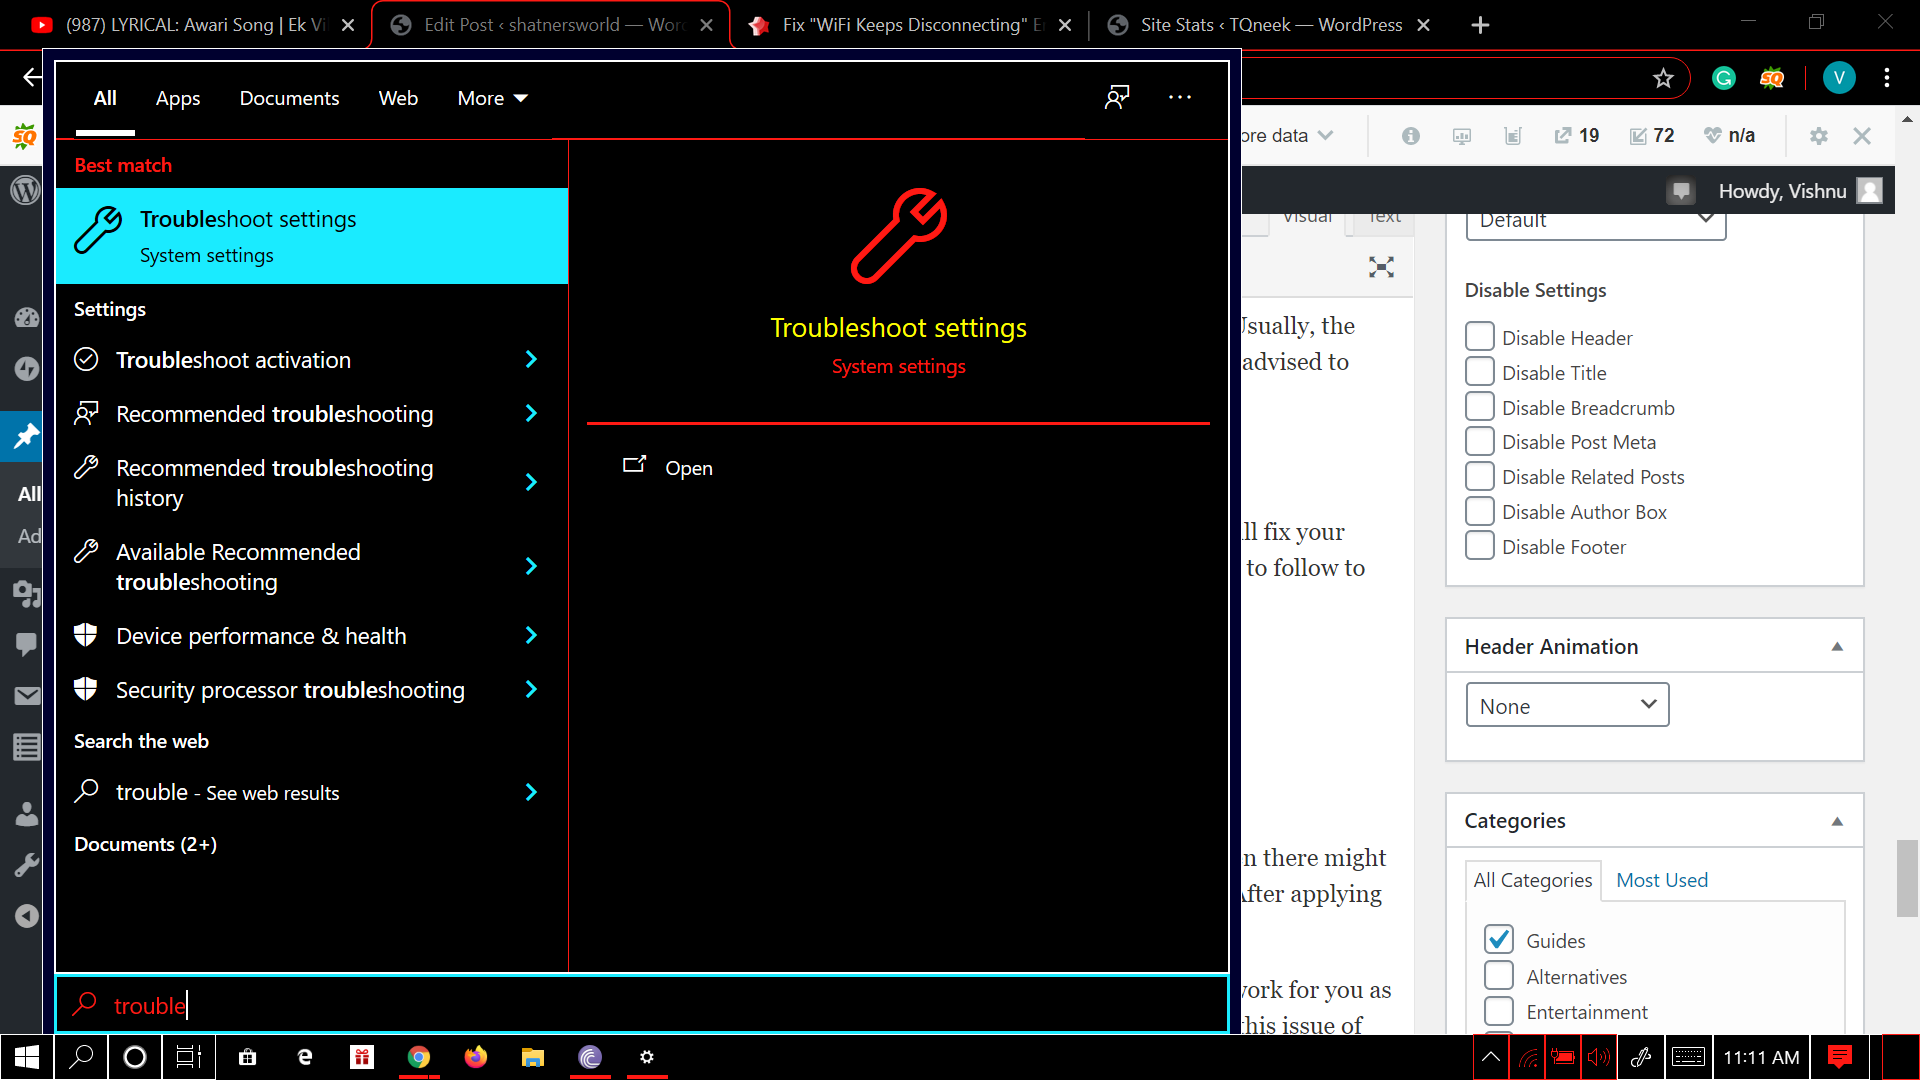
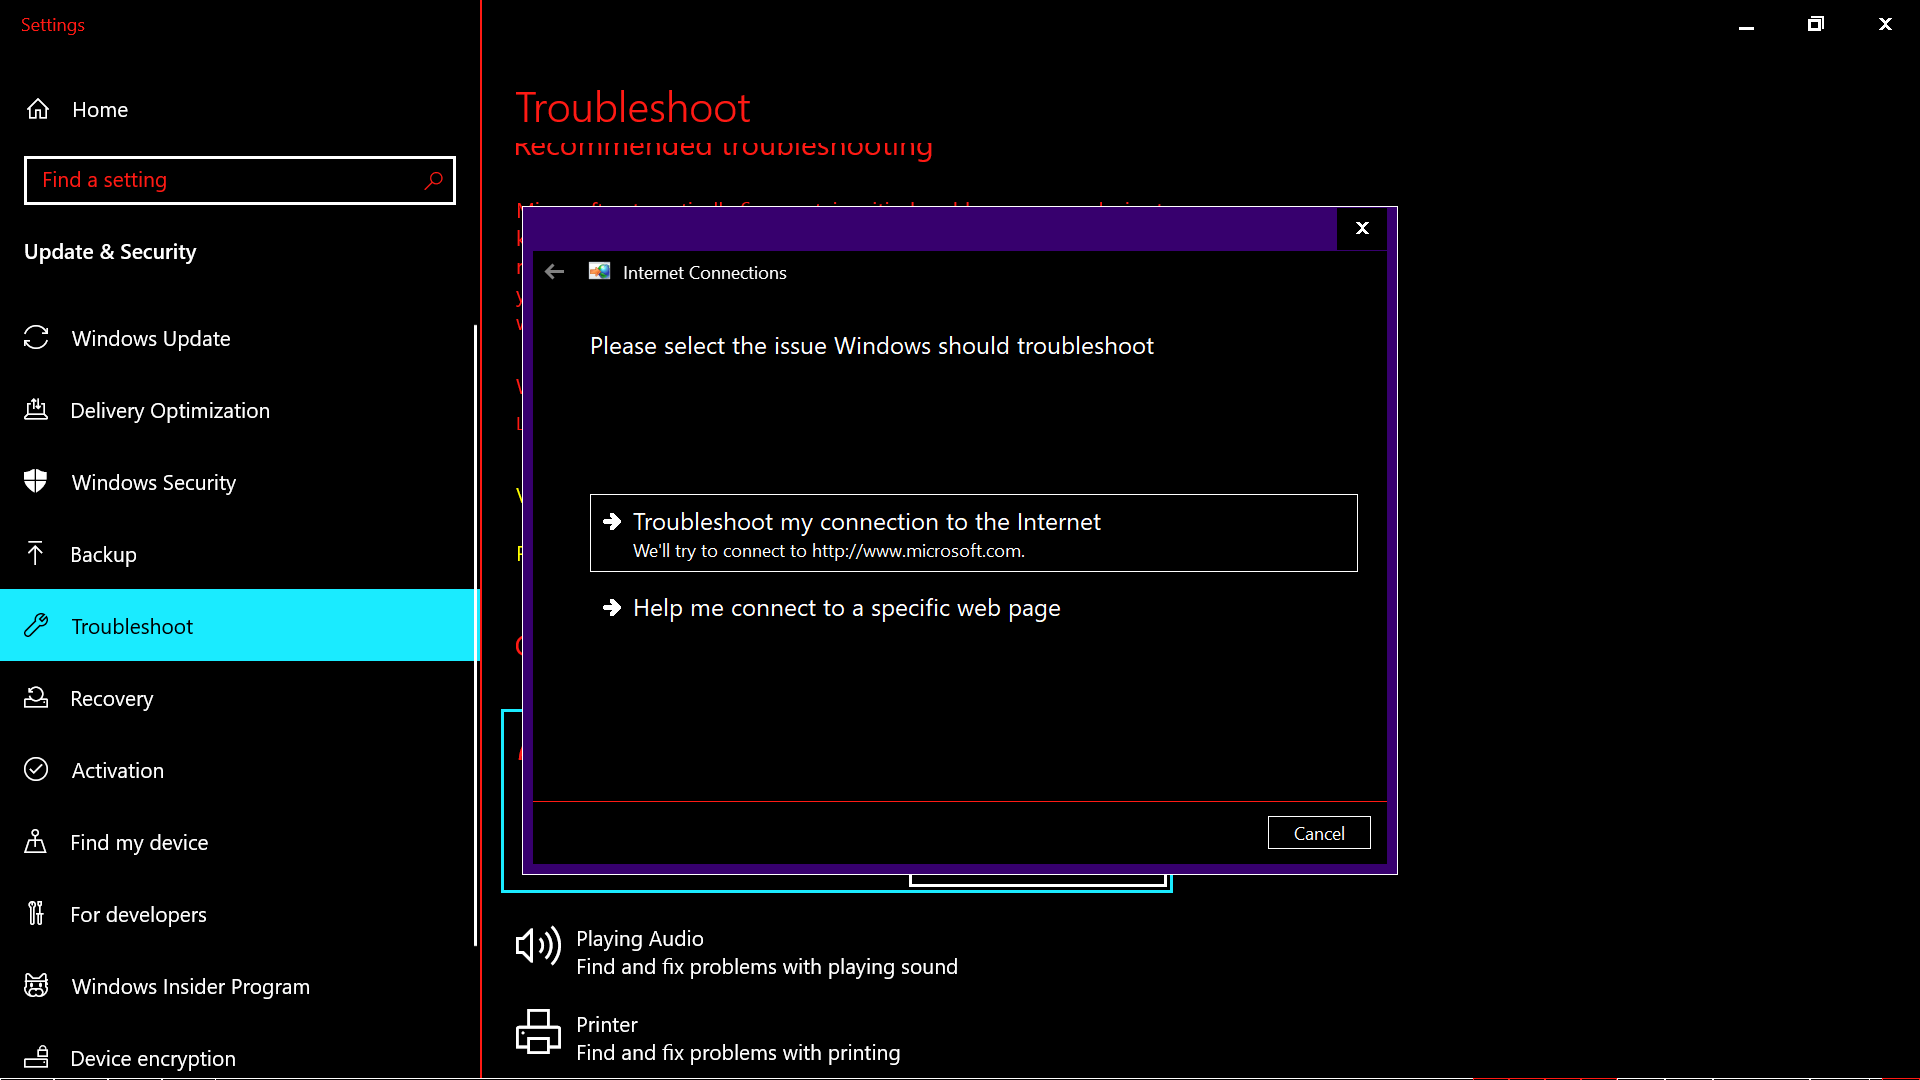
Windows come with the automated features of troubleshooting network problems. This will fix your issue and will also tell you the exact reason behind this issue. Here are steps that you need to follow to run the network troubleshooter:-

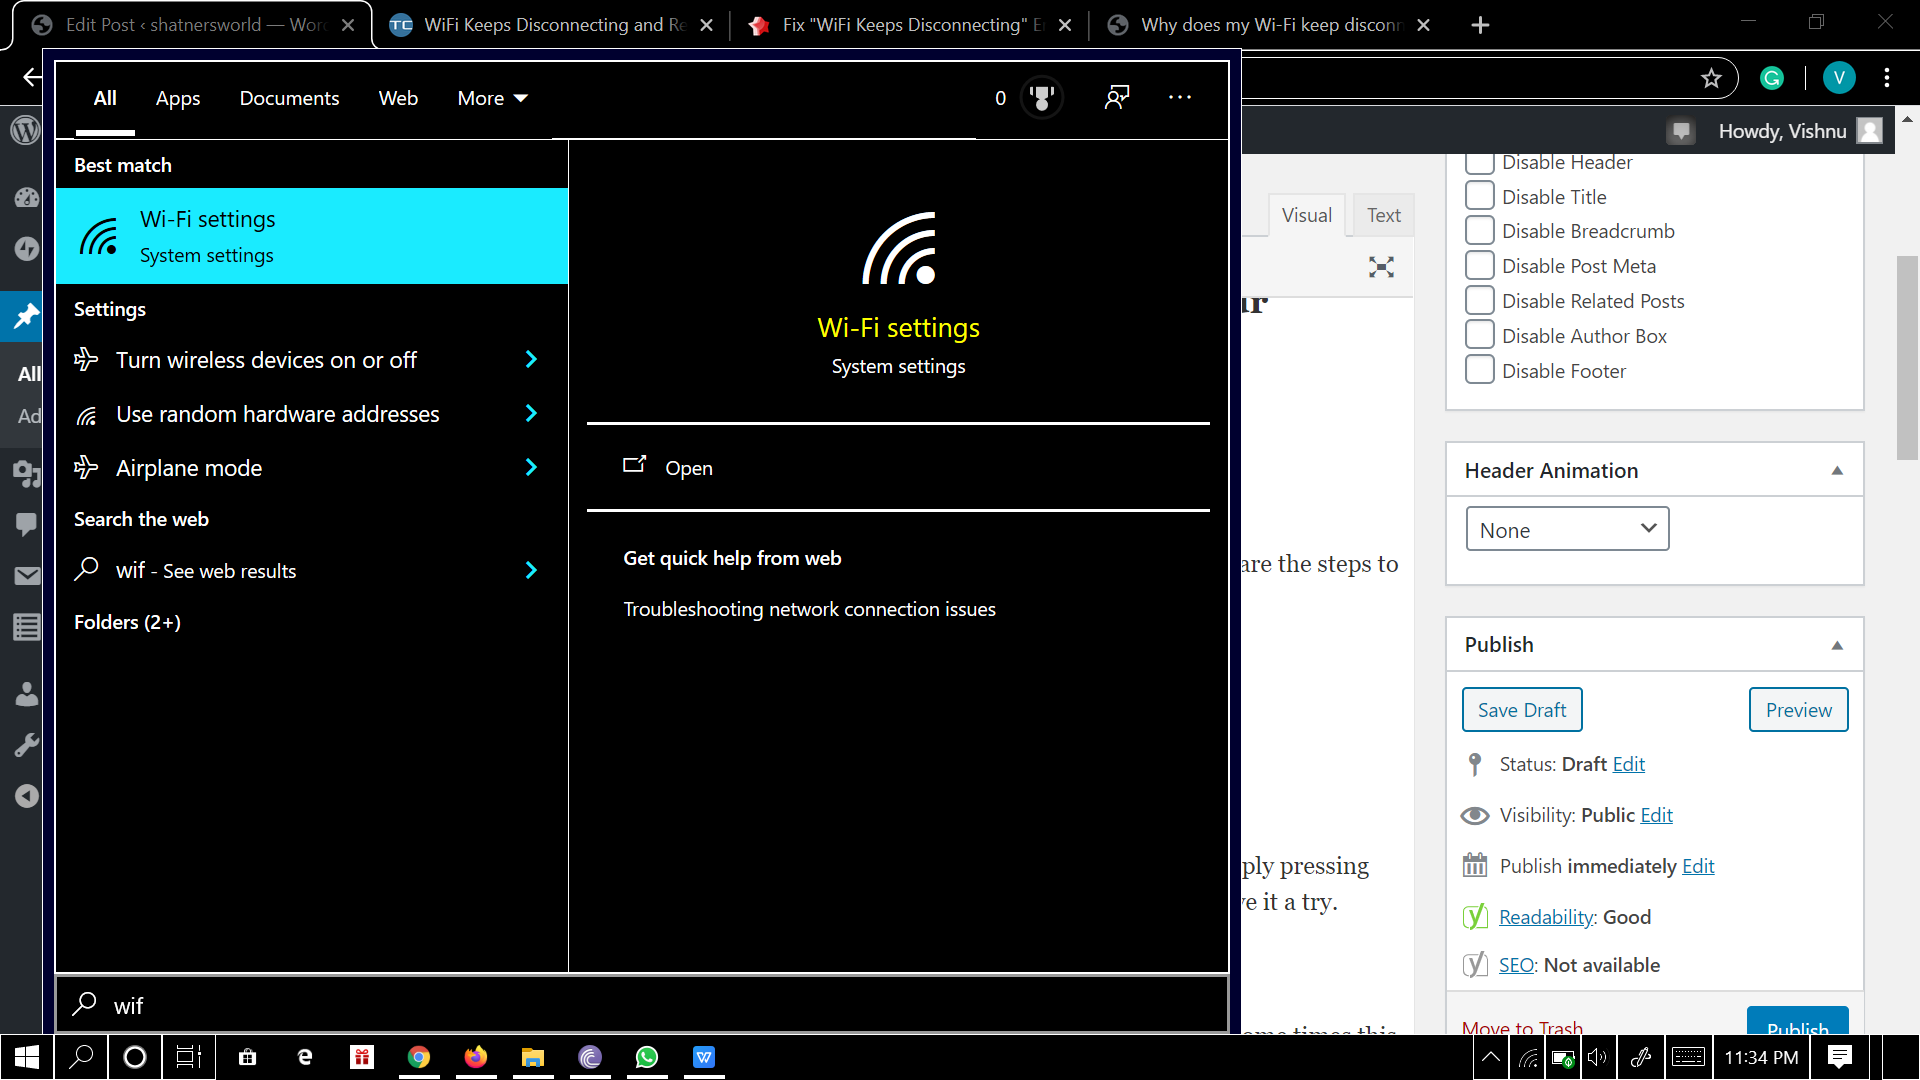
  1. Press Windows Key and search for “Troubleshoot settings”.Screenshot 129Screenshot 128
  2. Click on troubleshoot settings and open it.
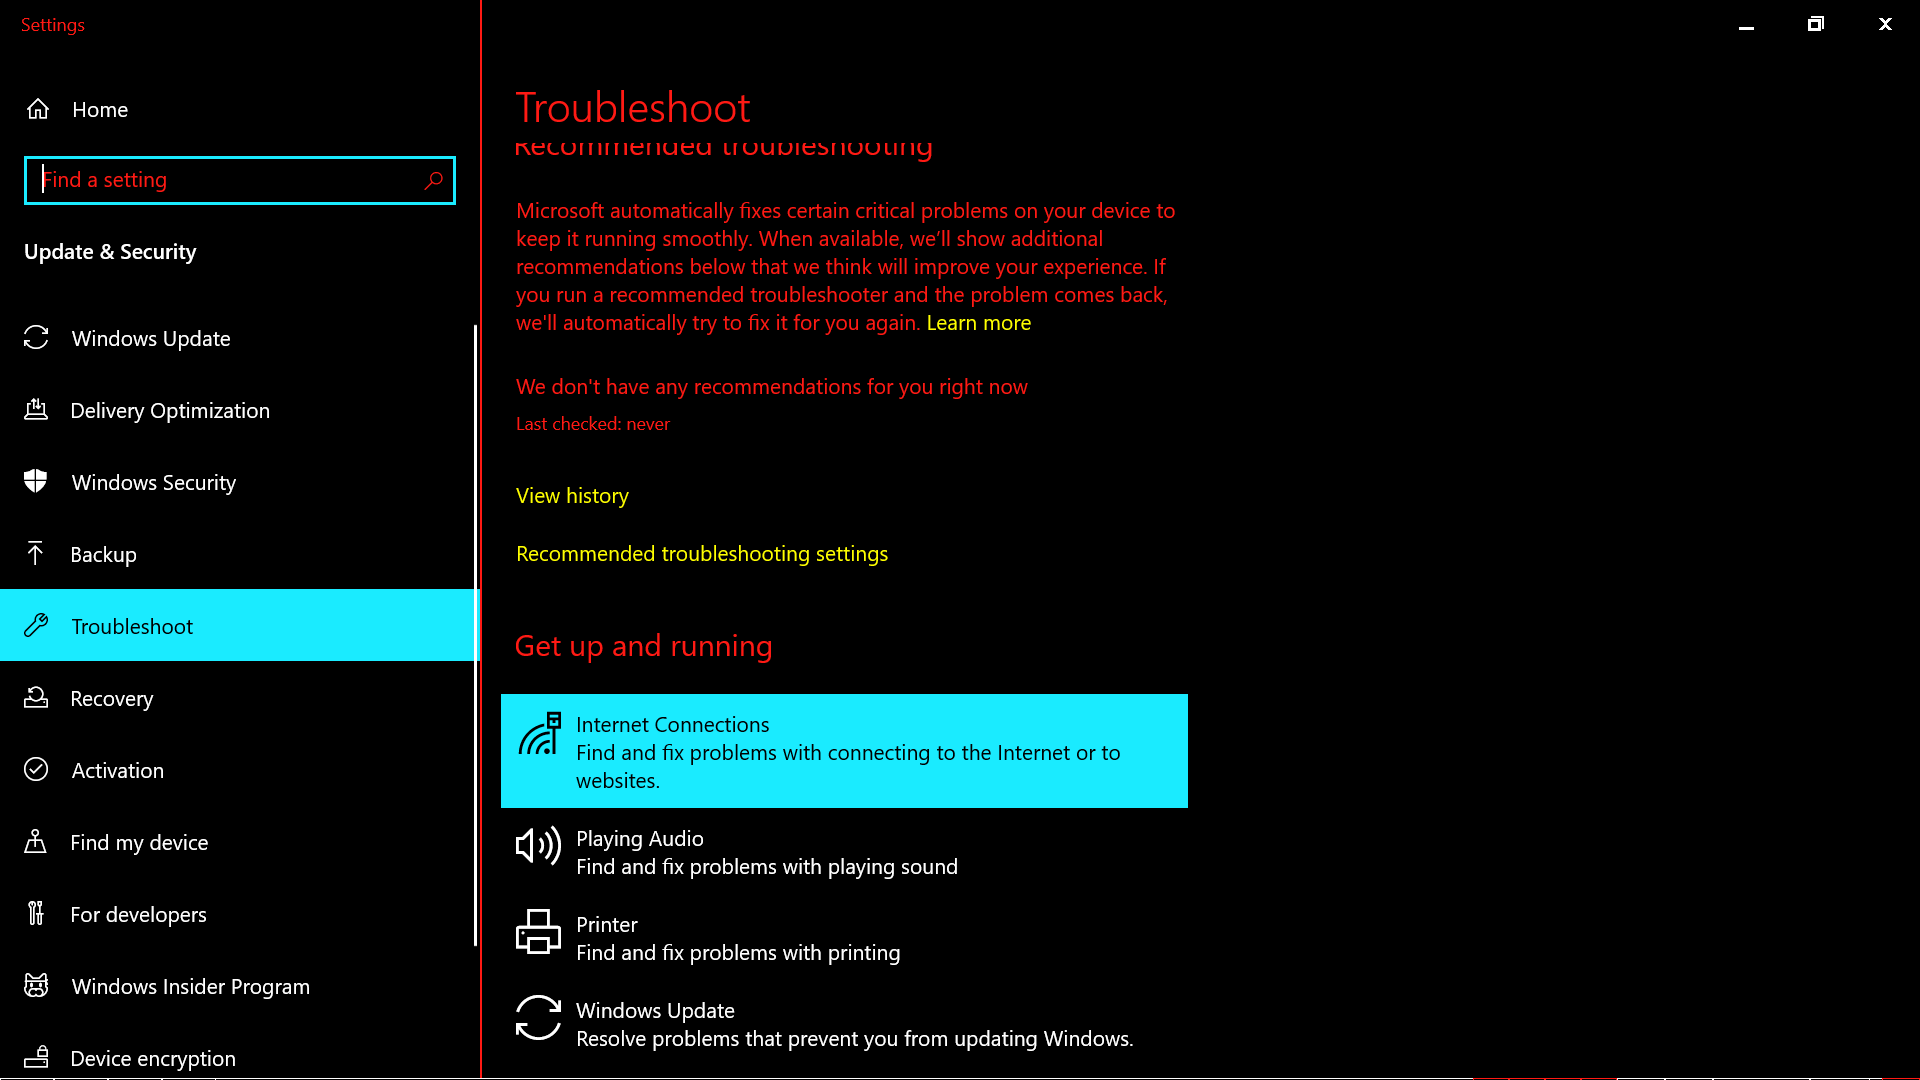
  3. After opening troubleshoots settings click on internet Settings to open it.Screenshot 128
  4. After Opening Internet settings click on run the troubleshooter.Screenshot 130
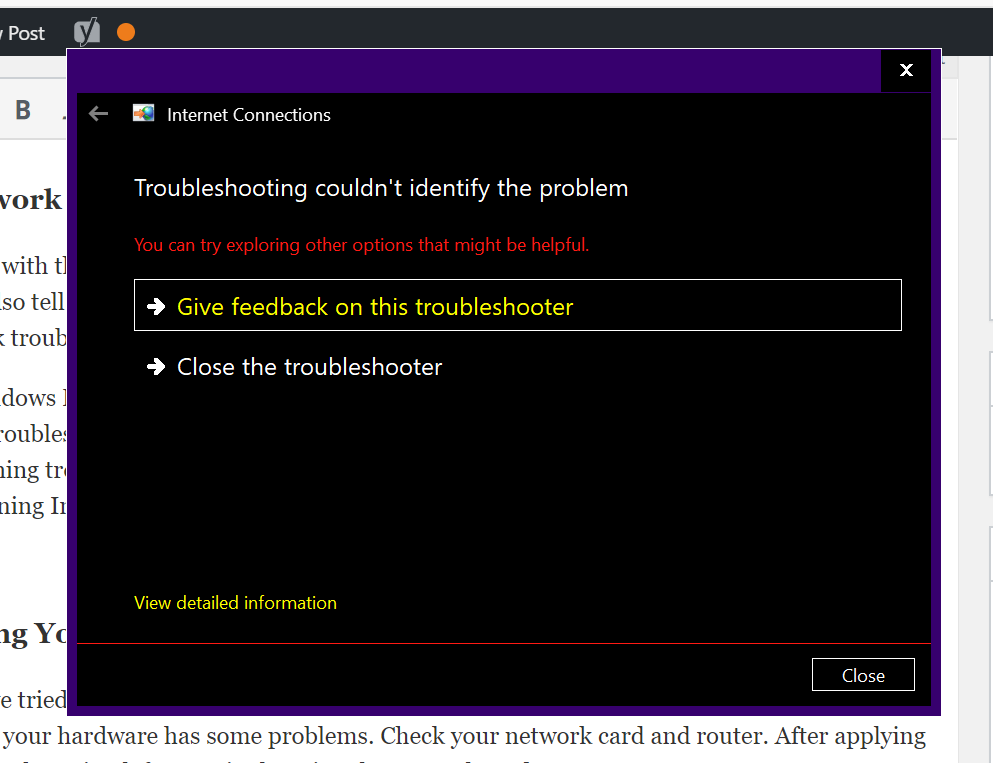
  5. It will run the troubleshooter and tell you & fix if there are any problems with it.Screenshot 131 e1591855128265

We have added screenshots with each step please follow them step by step. If this method does not fix your issue then move to the next methods given below.

10. Replacing Your Hardware

By now you have tried and tested all the methods above and your issue is still not fixed then there might be chances that your hardware has some problems. Check your network card and router. After applying al the methods only option left to try is changing the network card or router.

These were all the methods that we would tell you on our end. These methods will surely work for you as they are tried and tested by our own team. We are looking forward that you will surely fix this issue of your WiFi keeps disconnecting again and again.

Conclusion

Your device is just a piece of crap or simple storage device if it has no internet connection. Internet is known as soul of the devices as it keeps connected to the rest of the world by different means.

We hope that your WiFi disconnecting issue might have been fixed by now as all of these methods are working and will work for you surely. If these methods don’t solve your problem then you can contact us in the comments section. We will help you there for sure.

How To Fix YouTube Sign In Error?

0

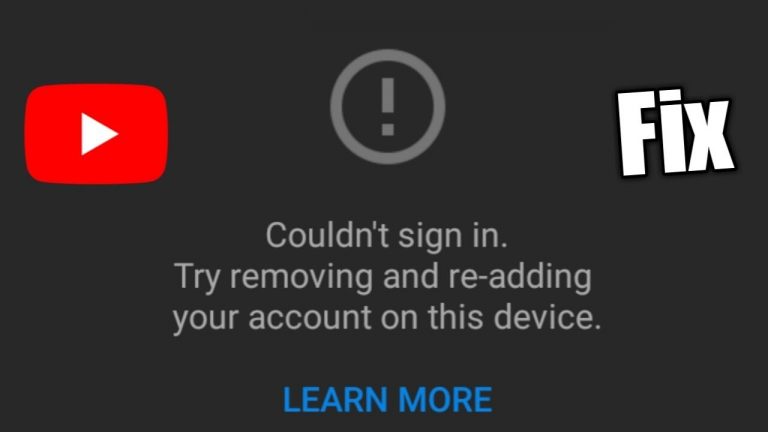
YouTube is the most popular online video streaming platform worldwide. However, sometime YouTube won’t let you sign in due to several reasons. If you’re wondering why does this happens? And how to fix YouTube won’t let me sign in issue. Then you’re on the right page, we’ve compiled all the possible reasons for YouTube sign in error and also how to fix it.

Contents

Causes For “Cannot Sign Into YouTube” Error?

Before start talking about fixing cannot sign into YouTube, let’s see all the possible reasons that cause this error.

1. Poor Internet Connection:-

Might be your internet connection is not stable. A poor or unstable internet connection can halt your connection with the YouTube server.

main qimg b6b2e828ecc1cae5bbaf0f0afcb9cbd7

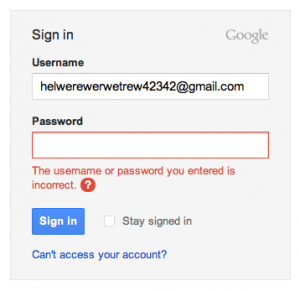
2. Invalid User Credentials:-

Make sure that the login credentials entered by you are correct. Some time due to mismatch of username and password, otherwise YouTube won’t let you sign in.

HUV8s

3. Problem With Browser:-

The browser can also be the culprit of YouTube cannot sign in problem. If you’ve made any changes in browser settings that might affect YouTube.

How To Fix YouTube Sign In Error

Below are some of the methods you can try if Youtube won’t let you sign in.

1. Enable Google Cookies:-

If you’re using your Google account to sign in into YouTube. Then you need to make sure that Google cookies are enabled. How to enable Google cookies? Follow the steps given below:-

  • Head to the Google page and click on three dots available in the top right corner. Choose Settings from the menu.
  • Scroll down until you cannot see the Advanced option. Tap on this.
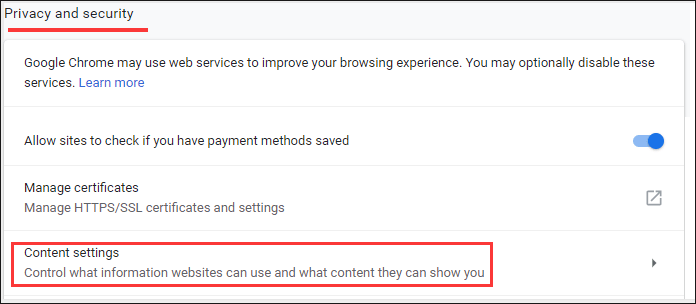
  • Locate the Content Setting available in the privacy and security setting.

issue signing you into youtube 1

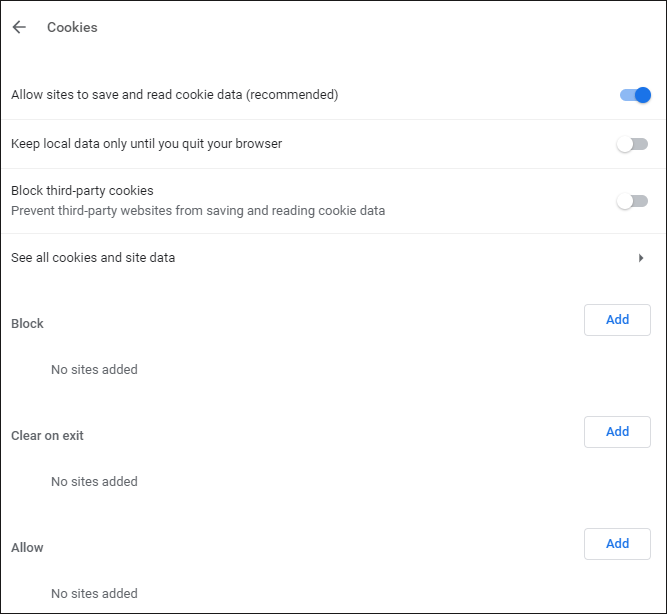
  • In the content, the section enables the “Allow site to read and save data”.

issue signing you into youtube 2

  • Once you’ve enabled the Gooogle cookies. Try again sign into YouTube account. If still issue remains the same then move to the next method.

2. Clear Cookies And Caches:-

Given steps will help you to clear cookies and caches:-

  • Go to the browser setting and click on Advanced.
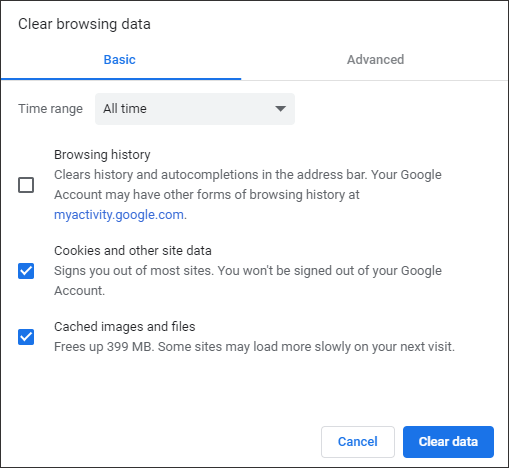
  • Head to the Privacy and Security section and tap on Clear Browsing Data.
  • Select the time range to all time and select Cookies and other site data and Cached images and files. Click on Clear Data when you finished.

issue signing you into youtube 3

3. Disable Browser Extensions:-

The browser extension can also be the culprit of YouTube cannot sign in problem. So, disable the browser extension and try again.

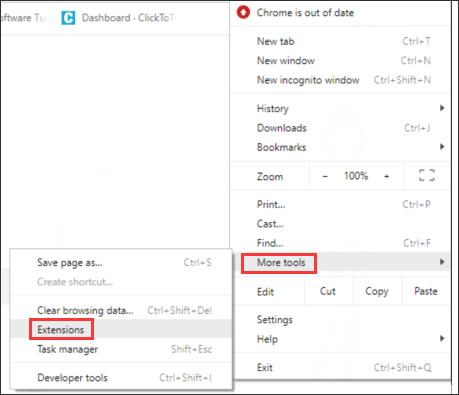
  • Open the browser and click on three dots and navigate to the More Tools>Extensions.

issue signing you into youtube 4

  • Tap on the Remove button to remove the extensions.

issue signing you into youtube 5

4. Use Browser in Incognito or Private Mode:-

Incognito or private browser helps many users to solve their problems. If you’re a chrome user then hold Ctrl+Shift+N to enter into private mode, or Firefox users hold Ctrl+Shift+p to enter into the private mode.

icongnito

5. Check If YouTube-Server Is Down:-

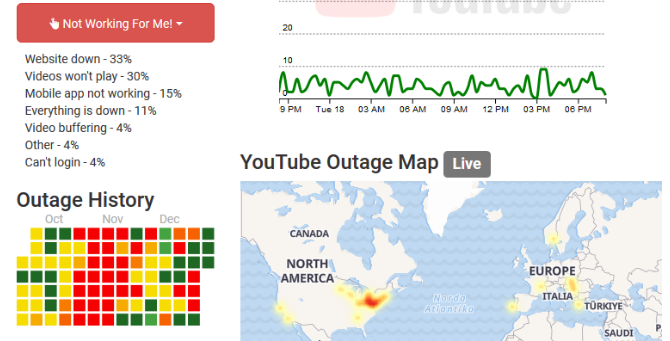
If Youtube won’t let you sign in, then there is a very rare occasion when YouTube is out of service. But it happened sometime before, so if we face any error then need to check the YouTube server. Two sites available online which helps to check whether YouTube is out of service or not.

  1. Downdetector.com
  2. Outage.report

youtube outage 670x341 1

6. Update Browser:-

You always need to make sure that you’re using the latest version of the browser. Usually, the browser automatically gets updated but still, we need manually check the browser to make sure we are using the updated version.

google chrome version 670x222 1

Go to the Help section of the chrome browser to check browser version. Click on About Google Chrome and check whether your browser is updated or not.

7. Switch To Another Browser:-

Even after updating the browser, you’re not able to sign in your YouTube account then I might suggest you use another browser. By switching to another browser can help you to fix this problem.

8. Update YouTube App:-

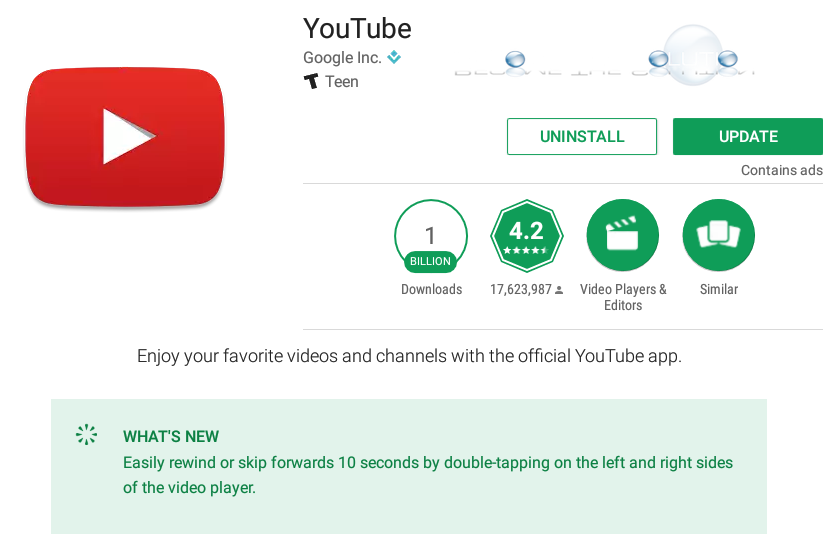
This is the last thing you can try if YouTube is not working. Both Android and iOS users can update YouTube respectively from Google Play Store or App Store.

youtube update 12 13 53 april 11 2017

Wrapping Up

So that was our article on how to fix YouTube sign in error. We’ve mentioned some of the best and common methods to fix this problem. Anyway, that’s all from us. If we helped you to fix YouTube won’t let me sign in then let us using our comment. Also if you’ve any other methods in your mind that help fixes the problem then share it with us.

How To Skip Or Block Hulu Ads?

0

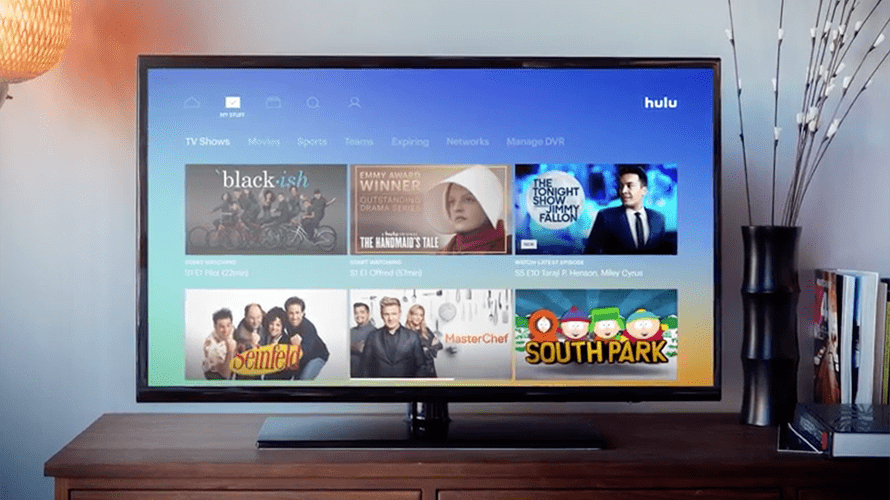
If you’re a movie lover then you must be heard about Hulu online streaming platform. On this page, we’ll show the process of how to block Hulu ads.

Hulu platform offers you to stream all your favorite movies, shows, TV series, etc. The subscription fee of Hulu is very low and it allows you to watch the content in Ultra Hd mode. All of these shows and movies come with ads, which interrupts the entertainment. To get rid of these ads, you need to block Hulu ads so they do not halt your movie.

1 header block hulu ads

Contents

Guide To Skip Or Block The Hulu Ads

Before we start on how to skip ads on the Hulu app, you all have to know that you will not be able to block Hulu ads completely. These ads help the Hulu app to earn revenue so they won’t let you block the ads without subscribing to it.

The tips and tricks, we’re going to discuss are 100% safe to try.

1. Skip Ads Using Ad-blocker:-

This is the easiest and effective way to enjoy your favorite shows and movies without ads. This method is also useful to block ads on various online streaming platforms like YouTube, Amazon Prime, Netflix, and any other website which contains ads.

uBlock Plus Ad-blocker:-

There are a number of adblockers available in the market, some of them are free and powerful. The easiest way to install and use adblocker on Pc with the help of the Google Chrome browser. Chrome browser has various ad blockers, uBlock Plus is the best ad blocker for Chrome browser.

Click here to download uBlock Plus

ublock plus

Sometimes adblocker blocks the whole video player because ads are embedded with the video. This happens because you’re using an older version of the flash player. You might need to install the latest version of the flash player to avoid such type of issues.

Blokada:-

Blokada adblocker helps you to block ads while you’re using Hulu on the mobile device. This app has various options that help to get rid of the ads. Blokanda is one of the effective third-party apps to block ads, you just need to install the app on your Android device. Once the installation is finished click on the blacklist option. There is an option called Goodbye ads you need to click on it to skip Hulu ads.

Blokada block hulu ads

2. Skip Ads By Opening Hulu In Two Tabs:-

You can open the same Hulu program in the two tabs, mute the one tab while enjoying the show on another tab. You can find the ad in the track bar and forward the show to that mark in the second tab to skip the ad.

That means if the ad starts in the first tab, you can mute it and switch to the second tab to continue watching and vice versa.

3. Refresh The Hulu Program Page:-

As we know that Hulu earns revenue from the ads and monthly subscription plans. These ads vary according to the duration of the video, the minimum duration of the ads is 30 seconds and the maximum duration is 4 minutes. For example, when you start watching the video the duration of the ad will be around 30 seconds but when the watching time is increased the ads time also increased can go up to 4 minutes. And these ads are enough to ruin the interest and excitement of watching the video.

Block Hulu Ads

So from this, we acknowledge that if we have recently landed on the Hulu page then the shown ads duration will be short. So we recommended you refresh the Hulu page from time to time in order to skip watching the long ads. This is a very simple step to skip the long-duration ads but you cannot block Hulu ads.

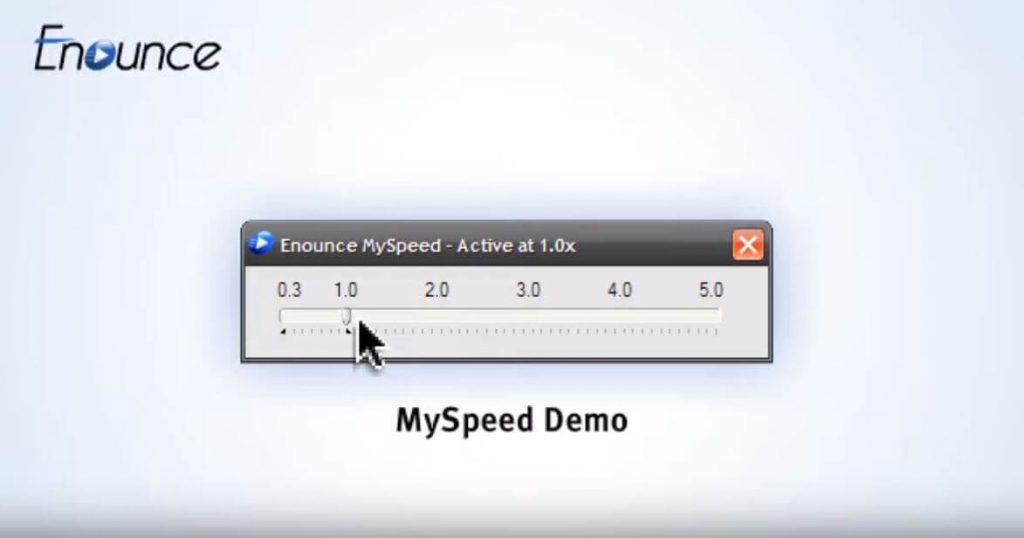
4. Fast Forward Hulu Ads Using Enounce MySpeed:-

You can fast forward the ads instead of blocking and skipping the ads. Enounce MySpeed is the software that lets you increase the playback speed of the video. This software can fast forward the 4-minute ad to around 1 minute.

That means you need not wait for long to skip the ads. The main drawback of this app that you need to pay $29.99 to purchase this app, this is not available for free. Also, Enounce MySpeed offers seven days of the trial period.

enounce mysppedc productivity video

5. Web Filtering:-

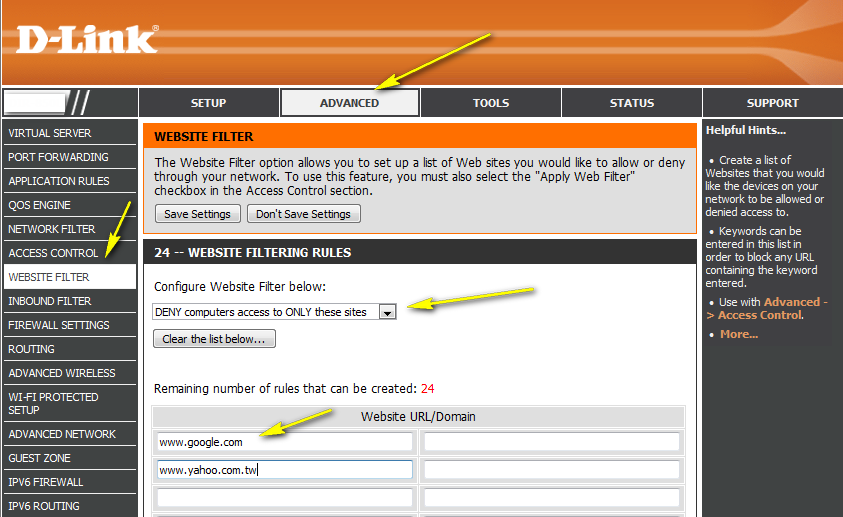
Hulu advertisements can also be blocked using web filtering available under Access Control or Parental Control in your router settings. Below are the steps to block Hulu ads using a web filtering option.

  • Connect with your router.
  • Open any browser to enter your router’s IP address in the search bar of the browser.
  • Now locate the web filtering option in the router admin panel.
  • In the web filter option add this address “ads-e-darwin.hulustream.com” without quotes.
  • Click on Apply and restart your computer.

web filtering

The above-mentioned address is responsible for Hulu advertisements, so when you add this domain to web filtering options, some of the ads are going to be blocked but it won’t block Hulu ads completely.

6. Upgrade To Hulu Premium:-

Upgrading to the Hulu premium is the official method to enjoy Hulu without commercials. The premium version of the Hulu starts from $11.99/month. Besides ad-blocking, you’ll get many other features also with the premium version of the Hulu. Hulu also offers one month of the free trial period.

huluplus

Wrapping Up:-

Well, this is the end of our today’s topic. I have tried to compile all the potential methods for blocking Hulu ads. If you’ve got a budget then I suggest you upgrade for Hulu premium.

Hulu premium has various advanced features along with adblocking. If you’ve any other method in your mind, then you can share it with us using our comment section.

How To Fix PlayStation Network Sign In Failed Error?

0

PlayStation network sign-in might fail because various reasons like the PlayStation network is out of service due to maintenance. Whenever the PlayStation server is out of service you may get a message “Login failed, please try again”. So reader, if you’re facing PlayStation network sign in failed error? Then you’re on the right page because I have the solutions you need to fix this problem.

Contents

How To Fix PlayStation Network Sign In Failed Error?

If you wish to check the network status of the PlayStation then you can do this using a website name “Down Detector“. This website will display the current server status of the PlayStation network. If the PlayStation server is down then you need to wait until PlayStation comes back online. Follow the solutions given below to fix the PlayStation network sign-in error.

1. Software Updates:-

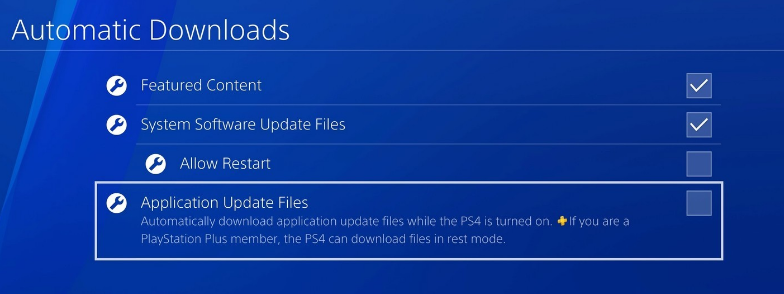
System software updating is the first solution you can opt to fix PlayStation sign-in issues. You can update the software navigating to the Setting>Software update.

Software Update

You need to make sure that you’ve downloaded the latest version of the software. Once the update is finished restart the PlayStation.

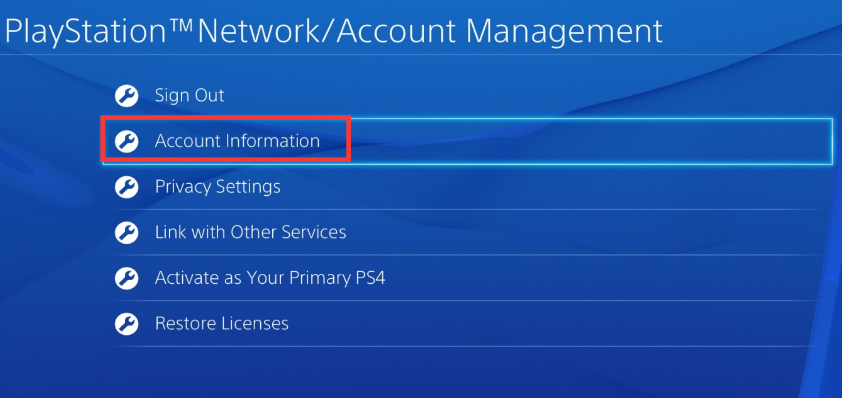
Head to the Setting of the PlayStation and then tap on the Account Management”.

Account Management

And to proceed further accept the Terms And Condition.

2. Disable Media Server:-

Follow the steps, to disable media server:-

  • Go to the setting and click on Network Setting.

Network Settings

  • Go to the Media Server Connection. Here you will find the Disable the media server.

3. Automatic Login:-

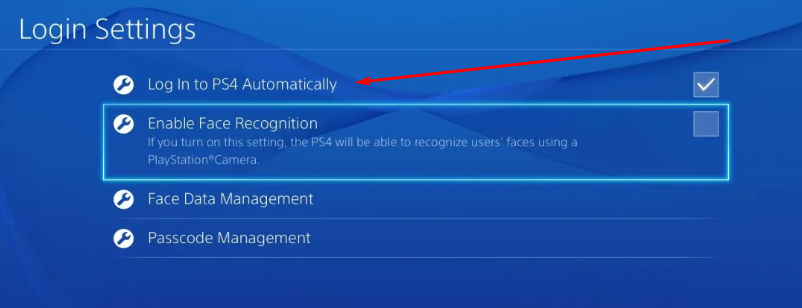
PlayStation can be set to log in automatically. Automatic Login is the hidden feature that lets you log in automatically when you switch on the PlayStation. To enable automatic login on PlayStation, go through below given quick steps:-

  • Go to the Settings and select the User Option.
  • Head to the login setting and check the box “Log In PS4 Automatically”.

Log in PS4 Automatically 1

When you’ve finished this, then restart the PlayStation and try again to sign in and see if your “PlayStation network sign in failed” error has disappeared.

4. Configure The DNS Settings:-

Below are the steps you need to follow to fix the PlayStation network issues.

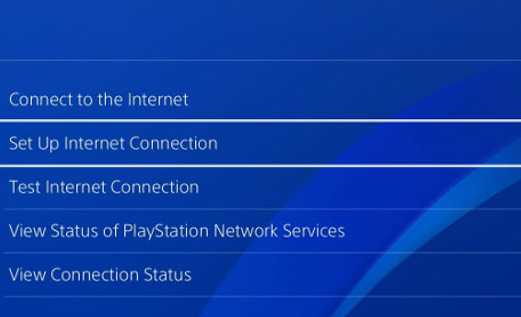
  • First head to the Settings and click on the Setup Internet Connection.
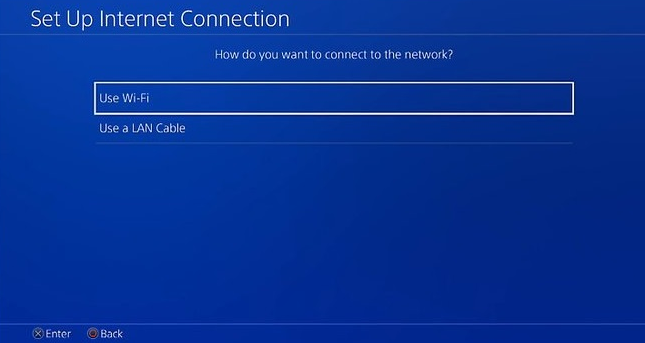
  • The next window will ask you some questions like “how do you want to connect to the network” and tap on Use Wi-Fi followed by the Custom.

dns 1

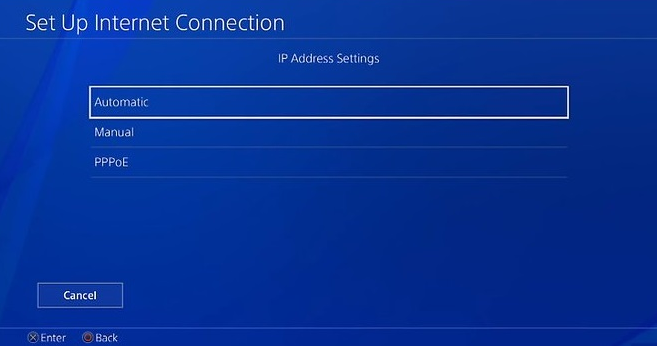
  • Choose the Wi-Fi network you want to connect with and select Automatic to skip IP address settings.

automatic

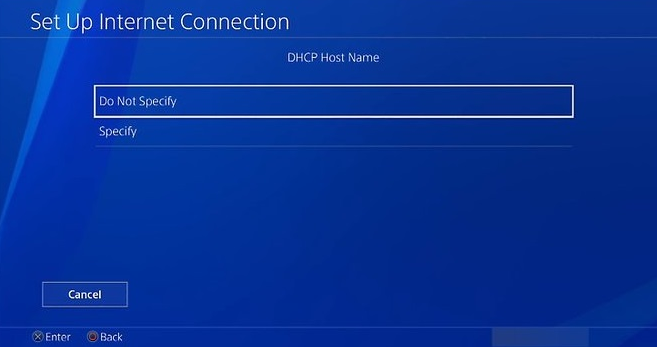
  • On the next DHCP hostname screen, choose the “Do not specify” option.

do not specify

  • In the DNS setting menu select manual and enter the Google DNS mentioned below.

Primary DNS:- 8.8.8.8

Secondary DNS:- 8.8.4.4

  • If the Google DNS doesn’t work then you can use OpenDNS IP address which is mentioned below:-

Primary DNS:- 208.67.222.222

Secondary DNS:- 208.67.220.220

  • When you’ve done with the IP address click on the Next.
  • In the MTU settings, select the “Manual” and enter the MTU value.
  • On the proxy server click on “Do Not Use” and tap on “Test Internet Connection”. This will check the internet setting.

5. Rebuild Database:-

This is another useful way to login to the PlayStation. To rebuild the database you need to turn off the PlayStation and after that press and hold the power button for 8 seconds or until you can’t hear the beep for the second time. Now you need to connect the dual shock to your PlayStation with the help of charging cable. Once connected press the PS button. Scroll down to find the rebuild database option and press “X” on it.

6. Website Fix:-

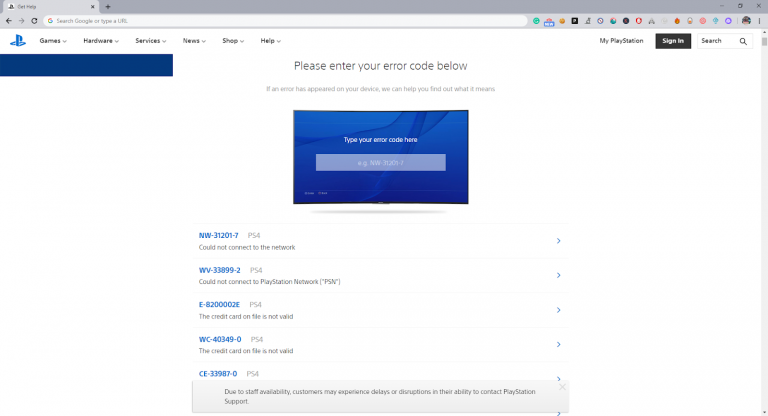
The official website of Sony offers quick fixes to the PSN users. PlayStation users can fix this issue by visiting this link “https://connection.support.playstation.com/en_IN#!/”.  This website helps you to get back the connectivity of the PlayStation as soon as possible.

psn signin error fix 768x416 1

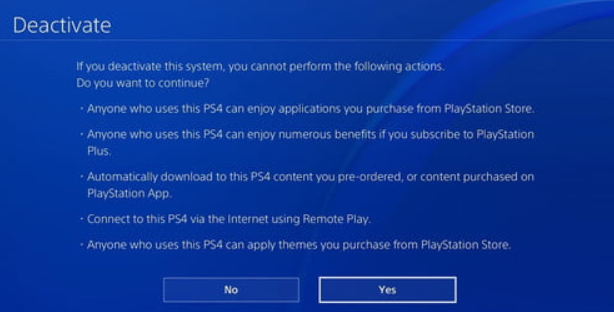
7. Reset To Factory Default Settings:-

If all the fixes we discussed so far are not able to fix the PlayStation sign in error then you can try this method. To reset your PlayStation to factory default settings, then you need to turn off the PlayStation.

ps3

After that, you need to hold the power button for up to 8 seconds or until you can’t hear the beep for the second time. Attach the dual shock 4 with your PS4 PlayStation with the help of charging cable, press the PS button. Reset the factory default setting and click on X.

Final Thoughts:-

The PlayStation network sign in failed is the common problem. Even after going through the solutions, the problem remains the same then unplugs the router and power off the PS4 for a few minutes.

After few minutes turn on your router and connect it with the PlayStation. If this doesn’t work for you then switch to another Wi-Fi network. So this brings us to the end of today’s topics.